Unlike AlloyDB Omni that customer needs to manage this standalone database, AlloyDB is a fully managed, PostgreSQL-compatible database running on GCP, supporting both transactional and analytical workload. It provides enterprise-grade performance and 99.99% availability targeting organizations that require to migrate, modernize, or build commercial-grade applications. AlloyDB is suitable for applications that require high transaction throughput, large database sizes, or multiple read resources; scale existing PostgreSQL workloads with no application changes; and modernize legacy proprietary databases.
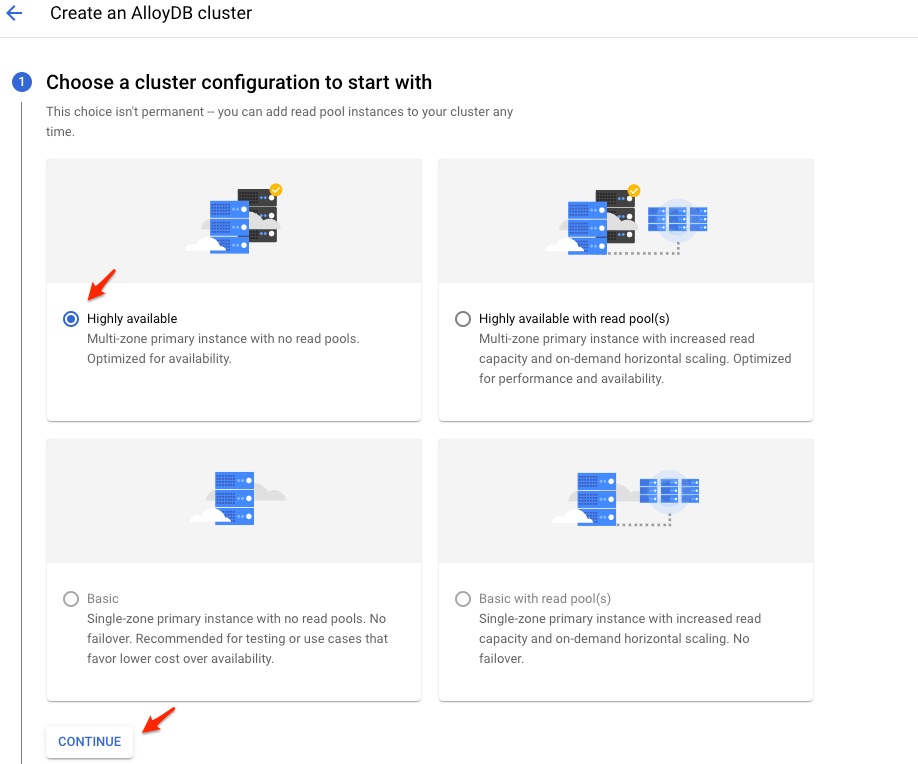
There are four types of cluster configuration. Obviously Highly available or Highly available with read pool(s) are best for enterprise level configuration. For my test, I want to click Basic, but it was greyed out. So I chose Highly available, then click Continue.
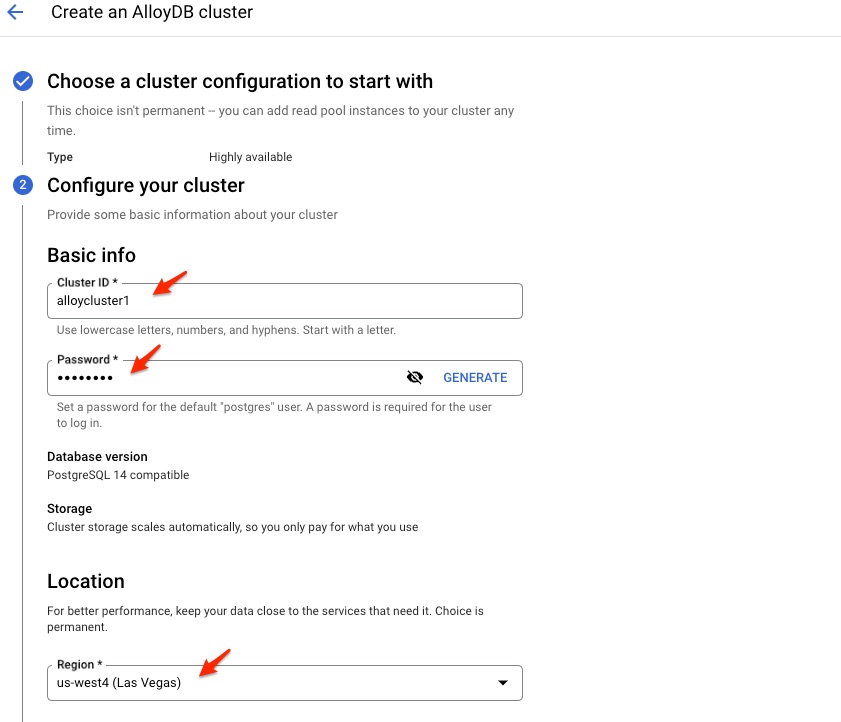
Input the cluster ID, password, and choose a region.
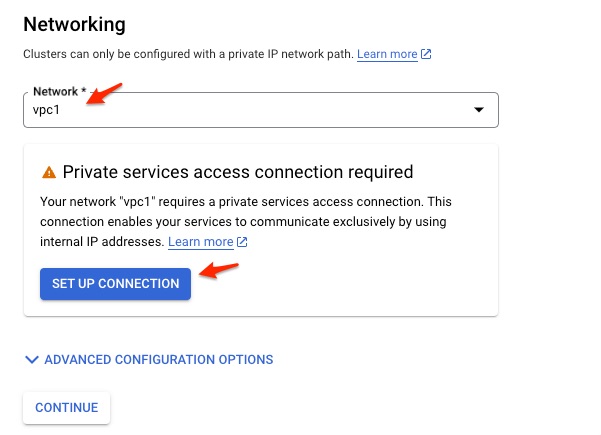
Choose my VPC. At this moment, a new screen pops up to require set up Private Service Access Connection. Because AlloyDB service is in a different network owned by Google. To avoid the traffic to the AlloyDB goes through internet, private service access allows VM instances in my VPC (in this case, vpc1) to communicate with AlloyDB service via private IP.
Click SET UP CONNECTION
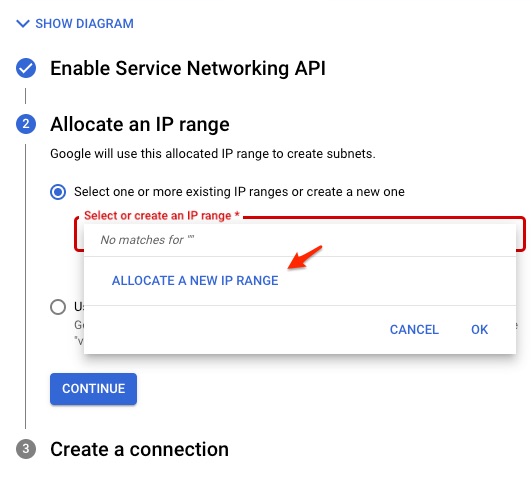
Setting up private service access connection requires you to specify an IP address ranges for services. Make sure this IP address range does not overlap with any existing ranges, subnets, or custom static routes.
When Enable screen shows up, click ALLOCATE A NEW IP RANGE
I gave a name of alloydb with IP range of 10.15.0.0/16, then click CONTINUE. Please note: name must use lower case, can not use any uppercase character in the name.
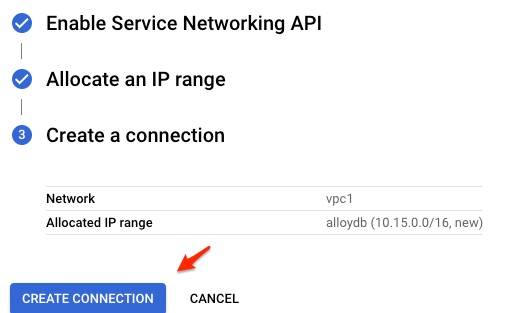
Click CREATE CONNECTION.
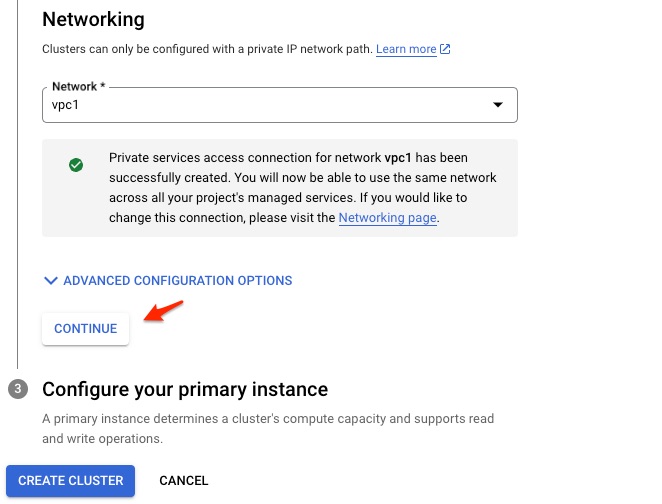
Once the private service access connection is created, click CONTINUE.
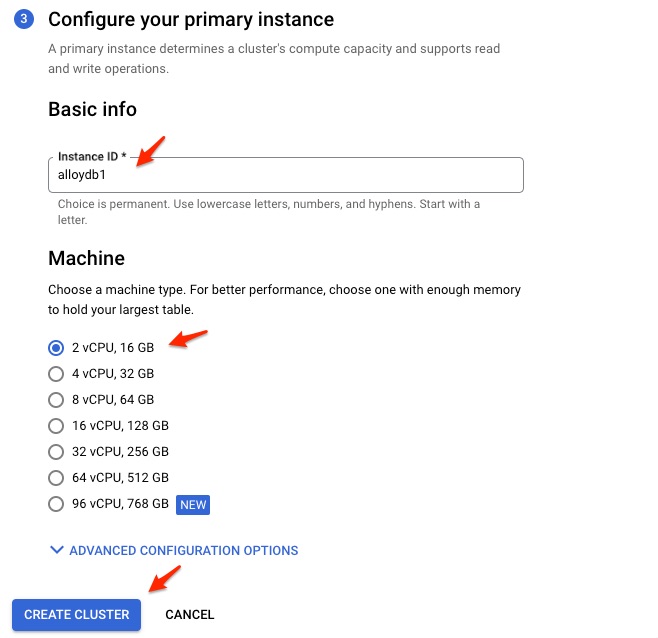
Give the name of Instance ID and machine type. I chose the smallest type from the list.
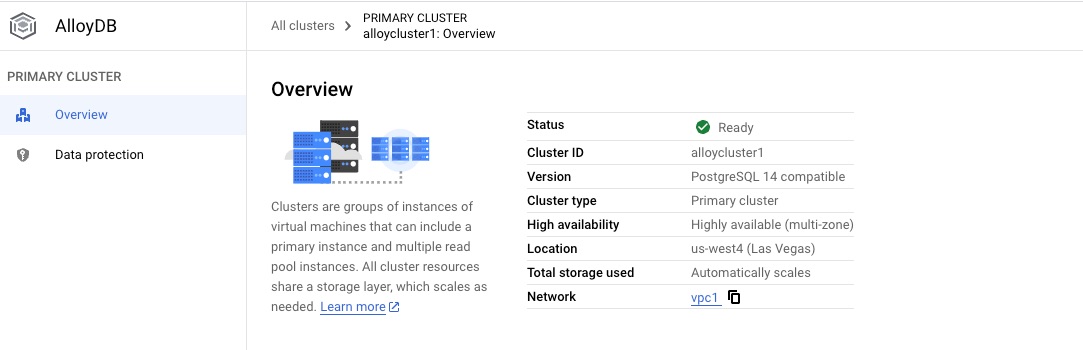
It will take about 8 to 10 minutes to create the cluster. Here is the screen looks like when it is ready.
In case you see an error of “Instances in cluster failed to create“. Just click CREATE PRIMARY INSTANCE, then re-input the instance name of alloydb1 and 2 CPU with 16 GB memory.
Once the cluster was create, let check out a few things:
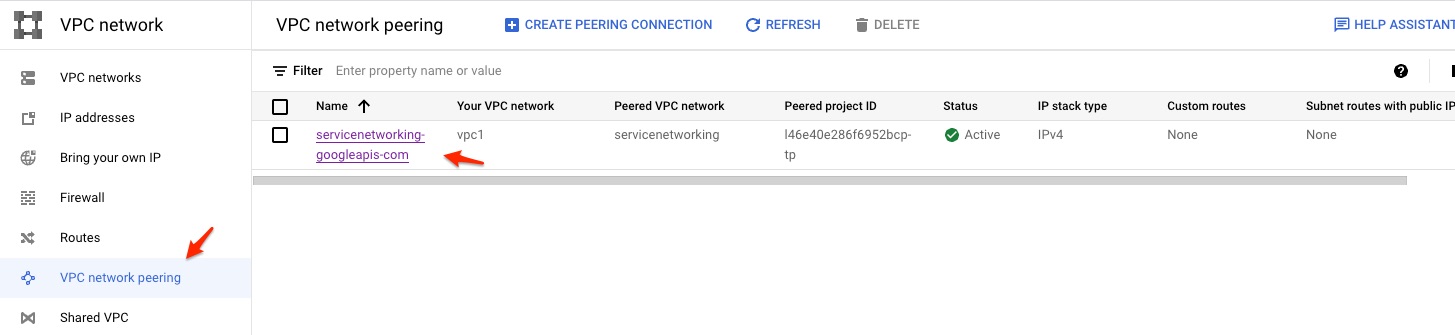
Remember the private service access connection, I can actually see it from menu VPC Network -> VPC network peering.
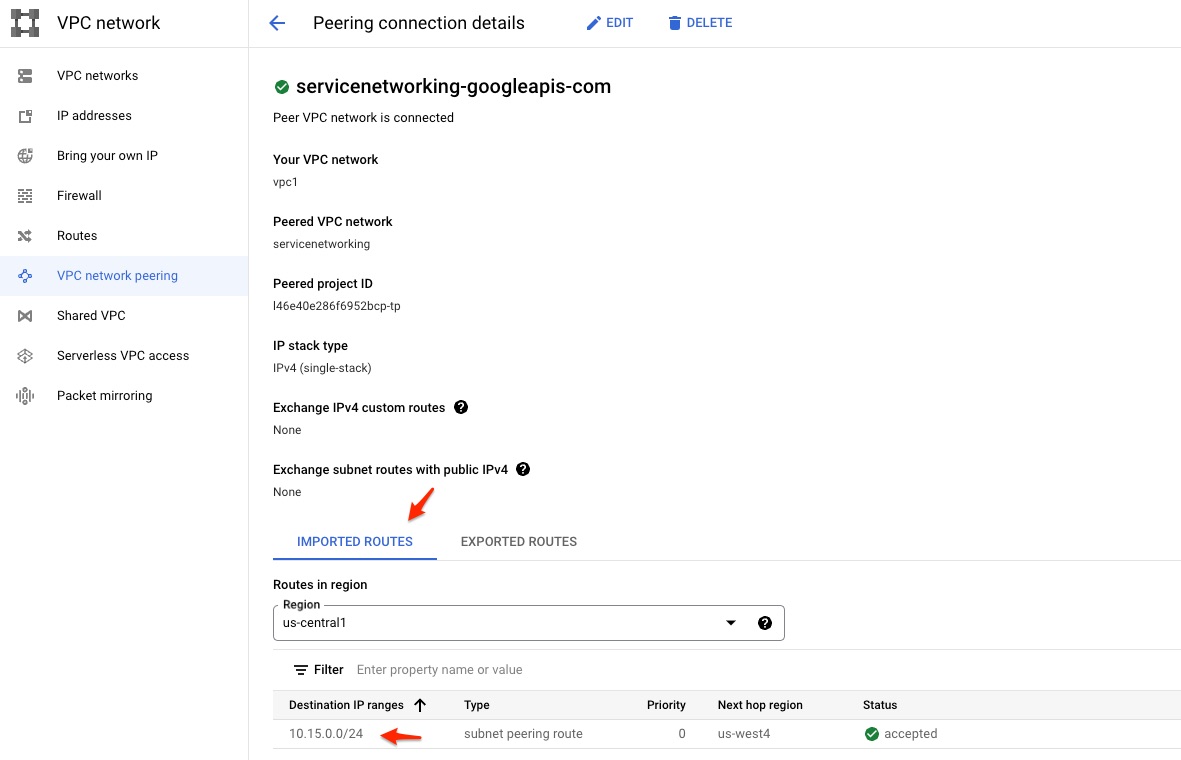
A little more detail about the peering.
If I want to add a reader instance, I can click ADD READ POOL INSTANCE to add one.
You can also run command gcloud beta alloydb instances list to check out the status of the AlloyDB cluster. Next we will discuss how to connect to AlloyDB
Configure AlloyDB via psql Client
As the VMs in the same VPC should have direct access to the AlloyDB cluster, I will reuse the pgdb VM instance from the Part 5 of blog series: Compare AlloyDB Omni with PostgreSQL.
This one is pretty straight forward with the following psql command running from pgdb vm.
[pguser@pgdb ~]$ psql -d postgres -U postgres -h 10.15.0.8
Password for user postgres:
psql (15.2, server 14.7)
SSL connection (protocol: TLSv1.3, cipher: TLS_AES_256_GCM_SHA384, compression: off)
Type "help" for help.

postgres=> \conninfo
You are connected to database "postgres" as user "postgres" on host "10.15.0.8" at port "5432".
SSL connection (protocol: TLSv1.3, cipher: TLS_AES_256_GCM_SHA384, compression: off)
Configure AlloyDB via Auth Proxy
AlloyDB Auth Proxy provides several benefits than the above psql direct connect approach, such as use IAM based principal to authorize the DB connections as well as automatic 256-bit AES encryption over TLS 1.3. This is how it works.
When an application connect to Auth Proxy, if there is no connection exist, then it calls AlloyDB Admin API to obtain an ephemeral SSL certificate and connect to AlloyDB. The SSL certificate expires in 24 hrs, but Auth Proxy will automatically refreshes it before it expires. The AlloyDB Auth Proxy connect to AlloyDB instance ONLY on port 5433. So make sure to have an outbound firewall policy on the client machine to allow outgoing connect to port 5433 to AlloyDB instance IP. All egress TCP connections on port 443 must be allowed as well.
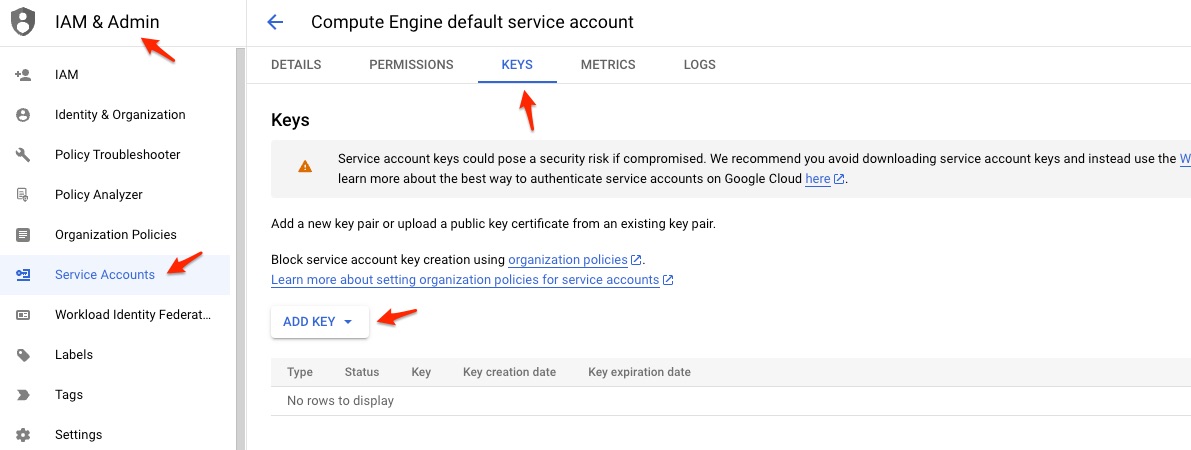
Get Key for the Service Account
For simplicity, I just use my Compute Engine default service account and generate the key for this account with the fiile name of mykey.json.
Click ADD KEY, then choose JSON key type. Save the file and use it later on.
Download and Configure Auth Proxy
Run the following command to download Auth Proxy as root user.
Then copy the JSON key file, mykey.json to the same folder. I will use a new port of 5566 instead of default port 5432. Execute the follow command to start Auth Proxy.
Run the following to create database and user, then change the password for both postgres and pguser.
su - postgres

export PGDB_USER=pguser
createuser ${PGDB_USER}
createdb tpch_db -O ${PGDB_USER}

psql -c "select usename from pg_user;"
psql -l

psql
show server_version;
\conninfo
alter user postgres with password 'postgres123';
alter user pguser with password 'pguser123';
\q
exit
[root@pgdb data]# su - postgres
[postgres@pgdb ~]$ export PGDB_USER=pguser
[postgres@pgdb ~]$ createuser ${PGDB_USER}
[postgres@pgdb ~]$ createdb tpch_db -O ${PGDB_USER}
[postgres@pgdb ~]$ psql -c "select usename from pg_user;"
 usename
----------
 postgres
 pguser
(2 rows)

[postgres@pgdb ~]$ psql -l
                                                 List of databases
   Name    |  Owner   | Encoding |   Collate   |    Ctype    | ICU Locale | Locale Provider |   Access privileges
-----------+----------+----------+-------------+-------------+------------+-----------------+-----------------------
 postgres  | postgres | UTF8     | en_US.UTF-8 | en_US.UTF-8 |            | libc            |
 template0 | postgres | UTF8     | en_US.UTF-8 | en_US.UTF-8 |            | libc            | =c/postgres          +
           |          |          |             |             |            |                 | postgres=CTc/postgres
 template1 | postgres | UTF8     | en_US.UTF-8 | en_US.UTF-8 |            | libc            | =c/postgres          +
           |          |          |             |             |            |                 | postgres=CTc/postgres
 tpch_db   | pguser   | UTF8     | en_US.UTF-8 | en_US.UTF-8 |            | libc            |
(4 rows)

[postgres@pgdb ~]$ psql
psql (15.2)
Type "help" for help.

postgres=# show server_version;
 server_version
----------------
 15.2
(1 row)
postgres=# \conninfo
You are connected to database "postgres" as user "postgres" via socket in "/var/run/postgresql" at port "5432".
postgres=# alter user postgres with password 'postgres123';
ALTER ROLE
postgres=# alter user pguser with password 'pguser123';
ALTER ROLE
postgres=# \q
[postgres@pgdb ~]$ exit
logout
[root@pgdb data]#
Copy TPCH data and related SQL scripts
I have already copied the TPCH data and related SQL scripts to a GCS bucket. So right now just need to copy the data and script to the right folder
su - pguser
cd
mkdir tpch
gsutil cp -r gs://<your GCS bucket>/database/tpch .
ls -l  tpch/tpch1g
ls -l  tpch/ddl
sed -i  's/alloyuser/pguser/' tpch/ddl/tpch_load_1g_data.sql
cat tpch/ddl/tpch_load_1g_data.sql
Create Database/Schema/Tables and Load TPCH Data
Run the following to create database/schema/tables and then load TPCH data. Make sure you are still in the session of pguser OS user.
psql -d tpch_db
\conninfo
create schema tpch1g;
SET search_path TO tpch1g, public;

##### Copy the DDL and datafile
\set cur_schema_name 'tpch1g'
\set cur_user 'pguser'
\set root_path '/home/pguser/tpch'

select :'root_path' "root_path";
select :'cur_schema_name' "cur_schema_name";
select :'cur_user' "cur_user";

GRANT SELECT, INSERT, UPDATE, DELETE, TRUNCATE, REFERENCES, TRIGGER ON ALL TABLES IN SCHEMA :"cur_schema_name" TO :"cur_user";
ALTER DEFAULT PRIVILEGES IN SCHEMA :"cur_schema_name" GRANT SELECT, INSERT, UPDATE, DELETE, TRUNCATE, REFERENCES, TRIGGER ON TABLES TO :"cur_user";

\i :root_path/ddl/tpch_create_table.sql
\i :root_path/ddl/tpch_create_index.sql
\i :root_path/ddl/tpch_load_1g_data.sql

\q
Compare TPCH Query Performance Between AlloyDB Omni and Postgres
Ok, right now. I have all of the data ready. Let’s do the comparison. The first query is the Query 6 I used in the last blog, Load TPCH Data into AlloyDB Omni. The performance is about 280 ms without enable_columnar_scan parameter setting to off and 27ms after the parameter was set to on and execute google_columnar_engine_recommend. Let’s how Postgres performs. The result is shown below.
tpch_db=> \timing on
Timing is on.
tpch_db=> SET search_path TO tpch1g, public;
SET
Time: 0.210 ms
tpch_db=> select
        sum(l_extendedprice * l_discount) as revenue
from
        lineitem
where
        l_shipdate >= date '1995-01-01'
        and l_shipdate < date '1995-01-01' + interval '1' year
        and l_discount between 0.09 - 0.01 and 0.09 + 0.01
        and l_quantity < 24
limit 1;
    revenue
----------------
 185724059.4734
(1 row)

Time: 622.051 ms
tpch_db=> select
        sum(l_extendedprice * l_discount) as revenue
from
        lineitem
where
        l_shipdate >= date '1995-01-01'
        and l_shipdate < date '1995-01-01' + interval '1' year
        and l_discount between 0.09 - 0.01 and 0.09 + 0.01
        and l_quantity < 24
limit 1;
    revenue
----------------
 185724059.4734
(1 row)

Time: 579.368 ms
tpch_db=> select
        sum(l_extendedprice * l_discount) as revenue
from
        lineitem
where
        l_shipdate >= date '1995-01-01'
        and l_shipdate < date '1995-01-01' + interval '1' year
        and l_discount between 0.09 - 0.01 and 0.09 + 0.01
        and l_quantity < 24
limit 1;
    revenue
----------------
 185724059.4734
(1 row)

Time: 591.576 ms
I execute the query three times and get result ranging from 579 to 622 ms. So for AlloyDB Omni, the performance is about 2 times faster without columnar engine or 20 times faster with columnar engine. This is great performance.
Let me try another query, Query 2 : Minimum Cost Supplier Query. This query finds which supplier should be selected to place an order for a given part in a given region. The query is shown below:
select
	s_acctbal,
	s_name,
	n_name,
	p_partkey,
	p_mfgr,
	s_address,
	s_phone,
	s_comment
from
	part,
	supplier,
	partsupp,
	nation,
	region
where
	p_partkey = ps_partkey
	and s_suppkey = ps_suppkey
	and p_size = 25
	and p_type like '%STEEL'
	and s_nationkey = n_nationkey
	and n_regionkey = r_regionkey
	and r_name = 'EUROPE'
	and ps_supplycost = (
		select
			min(ps_supplycost)
		from
			partsupp,
			supplier,
			nation,
			region
		where
			p_partkey = ps_partkey
			and s_suppkey = ps_suppkey
			and s_nationkey = n_nationkey
			and n_regionkey = r_regionkey
			and r_name = 'EUROPE'
	)
order by
	s_acctbal desc,
	n_name,
	s_name,
	p_partkey
LIMIT 100;
Here is the result looks like
Database Type
Columnar Engine
Execution SeqNo
Execution Time
AlloyDB Omni (v15.2)
Off
1
300.949 ms
Off
2
296.547 ms
On
1
207.195 ms
On
2
170.969 ms
PostgreSQL (v15.2)
N/A
1
430.005 ms
N/A
2
394.203 ms
So the result above shows AlloyDB Omni is slightly better, about 30% faster, without columnar engine, and more than 2 times faster with columnar engine on.
So AlloyDB Omni is indeed faster from my test cases than PostgreSQL. Please note, AlloyDB Omni is a standalone version of AlloyDB that can be run anywhere. The AlloyDB cluster running on the GCP infrastructure will be much faster compared with the single instance AlloyDB Omni. AlloyDB Omni is definitely a good way to test out AlloyDB columnar store anywhere you want. As many people are concerning the rising cost of cloud based resource, AlloyDB Omni is a good and cheaper way to use for DEV and TEST environment while AlloyDB cluster can be used in Pre-Prod or Production environment.
In the next blog, I will discuss how to create AlloyDB cluster and access it from laptop.
How do we load the TPCH data and what does the performance looks like?
Generate TPCH Data
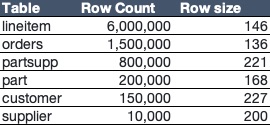
TPCH is a popular benchmarking dataset generation tools and a set of associated queries. Many organizations use it for benchmarking database performance. The dataset can be generated based on size criteria, such as 1GB, 100GB, or much bigger. For my little VM, 1GB dataset will be fine. The largest table, lineitem, contains 6 million rows in 1GB dataset. The following shows the detail of the row count for each tables.
So you can see, 1000GB dataset will have 6 billion rows in lineitem table and 1.5 billion rows in orders table. It is possible to download 1GB dataset somewhere from internet. But I prefer to build up the dataset by myself. The tools to build up this dataset is called, dbgen. Before I can use this tools, I need to install a few packages to allow me to compile dbgen source code. Those packages has been taken care of in the Step 2 of Part 2 Blog Series. So I do not need to install them anymore. Just execute the following to download and compile dbgen code.
cd
mkdir tpch
cd tpch
wget https://github.com/electrum/tpch-dbgen/archive/refs/heads/master.zip
unzip master.zip
cd tpch-dbgen-master/
echo "#define EOL_HANDLING 1" >> config.h # remove the tail '|'
make
You may see some redefine warning messages. Just ignore them. Ok, let generate the 1GB dataset with 1 file per table. To improve the load performance for large dataset,
-- This script requires the definition of cur_schema_name variable

select :'cur_schema_name' "Create Table : cur_schema_name";

create unique index c_ck on :"cur_schema_name".customer (c_custkey asc) ;
create index c_nk on :"cur_schema_name".customer (c_nationkey asc) ;
create unique index p_pk on :"cur_schema_name".part (p_partkey asc) ;
create unique index s_sk on :"cur_schema_name".supplier (s_suppkey asc) ;
create index s_nk on :"cur_schema_name".supplier (s_nationkey asc) ;
create index ps_pk on :"cur_schema_name".partsupp (ps_partkey asc) ;
create index ps_sk on :"cur_schema_name".partsupp (ps_suppkey asc) ;
create unique index ps_pk_sk on :"cur_schema_name".partsupp (ps_partkey asc, ps_suppkey asc) ;
create unique index ps_sk_pk on :"cur_schema_name".partsupp (ps_suppkey asc, ps_partkey asc) ;
create unique index o_ok on :"cur_schema_name".orders (o_orderkey asc) ;
create index o_ck on :"cur_schema_name".orders (o_custkey asc) ;
create index o_od on :"cur_schema_name".orders (o_orderdate asc) ;
create index l_ok on :"cur_schema_name".lineitem (l_orderkey asc) ;
create index l_pk on :"cur_schema_name".lineitem (l_partkey asc) ;
create index l_sk on :"cur_schema_name".lineitem (l_suppkey asc) ;
--create index l_ln on :"cur_schema_name".lineitem (l_linenumber asc) ;
create index l_sd on :"cur_schema_name".lineitem (l_shipdate asc) ;
create index l_cd on :"cur_schema_name".lineitem (l_commitdate asc) ;
create index l_rd on :"cur_schema_name".lineitem (l_receiptdate asc) ;
--create unique index l_ok_ln on :"cur_schema_name".lineitem (l_orderkey asc, l_linenumber asc) ;
--create unique index l_ln_ok on :"cur_schema_name".lineitem (l_linenumber asc, l_orderkey asc) ;
create index l_pk_sk on :"cur_schema_name".lineitem (l_partkey asc, l_suppkey asc) ;
create index l_sk_pk on :"cur_schema_name".lineitem (l_suppkey asc, l_partkey asc) ;
create unique index n_nk on :"cur_schema_name".nation (n_nationkey asc) ;
create index n_rk on :"cur_schema_name".nation (n_regionkey asc) ;
create unique index r_rk on :"cur_schema_name".region (r_regionkey asc) ;
tpch_load_1g_data.sql
\copy :"cur_schema_name".region     from '/home/alloyuser/tpch/data/tpch1g/region.tbl'        DELIMITER '|' CSV;
\copy :"cur_schema_name".nation     from '/home/alloyuser/tpch/data/tpch1g/nation.tbl'        DELIMITER '|' CSV;
\copy :"cur_schema_name".customer   from '/home/alloyuser/tpch/data/tpch1g/customer.tbl'    DELIMITER '|' CSV;
\copy :"cur_schema_name".supplier   from '/home/alloyuser/tpch/data/tpch1g/supplier.tbl'    DELIMITER '|' CSV;
\copy :"cur_schema_name".part       from '/home/alloyuser/tpch/data/tpch1g/part.tbl'            DELIMITER '|' CSV;
\copy :"cur_schema_name".partsupp   from '/home/alloyuser/tpch/data/tpch1g/partsupp.tbl'    DELIMITER '|' CSV;
\copy :"cur_schema_name".orders     from '/home/alloyuser/tpch/data/tpch1g/orders.tbl'        DELIMITER '|' CSV;
\copy :"cur_schema_name".lineitem   from '/home/alloyuser/tpch/data/tpch1g/lineitem.tbl'    DELIMITER '|' CSV;
Create Tables for TPCH and Load Data
Right now we have both data and SQL scripts ready. We can create database, schema and tables using the commands below. Note: do not execute these scripts and commands from psql within the Omni container as the scripts and data are in the hosting VM, not the container.
Create DB/Schema/Tables and Load Data
psql -h localhost -U postgres

CREATE EXTENSION IF NOT EXISTS google_columnar_engine;

CREATE USER tpchuser WITH PASSWORD 'alloy123' CREATEDB;
CREATE DATABASE tpch_db OWNER tpchuser;

\c tpch_db
CREATE SCHEMA tpch1g;
set search_path to tpch1g;

\set cur_schema_name 'tpch1g'
\set cur_user 'tpchuser'
\set root_path '/home/alloyuser/tpch'

select :'root_path' "root_path";
select :'cur_schema_name' "cur_schema_name";
select :'cur_user' "cur_user";

GRANT SELECT, INSERT, UPDATE, DELETE, TRUNCATE, REFERENCES, TRIGGER ON ALL TABLES IN SCHEMA :"cur_schema_name" TO :"cur_user";
ALTER DEFAULT PRIVILEGES IN SCHEMA :"cur_schema_name" GRANT SELECT, INSERT, UPDATE, DELETE, TRUNCATE, REFERENCES, TRIGGER ON TABLES TO :"cur_user";

\i :root_path/ddl/tpch_create_table.sql
\i :root_path/ddl/tpch_create_index.sql
\q
The execution result is shown below:
postgres=# CREATE USER tpchuser WITH PASSWORD 'alloy123' CREATEDB;
CREATE ROLE
postgres=# CREATE DATABASE tpch_db OWNER tpchuser;
CREATE DATABASE
postgres=# \c tpch_db
psql (13.11, server 15.2)
WARNING: psql major version 13, server major version 15.
         Some psql features might not work.
You are now connected to database "tpch_db" as user "postgres".
tpch_db=# CREATE EXTENSION IF NOT EXISTS google_columnar_engine;
NOTICE:  extension "google_columnar_engine" already exists, skipping
CREATE EXTENSION
tpch_db=# \c tpch_db tpchuser
psql (13.11, server 15.2)
WARNING: psql major version 13, server major version 15.
         Some psql features might not work.
You are now connected to database "tpch_db" as user "tpchuser".
tpch_db=> \conninfo
You are connected to database "tpch_db" as user "tpchuser" on host "localhost" (address "::1") at port "5432".
tpch_db=> CREATE SCHEMA tpch1g;
CREATE SCHEMA
tpch_db=> set search_path to tpch1g;
SET
tpch_db=> \set cur_schema_name 'tpch1g'
tpch_db=> \set cur_user 'tpchuser'
tpch_db=> \set root_path '/home/alloyuser/tpch'
tpch_db=> select :'root_path' "root_path";
      root_path
----------------------
 /home/alloyuser/tpch
(1 row)

tpch_db=> select :'cur_schema_name' "cur_schema_name";
 cur_schema_name
-----------------
 tpch1g
(1 row)

tpch_db=> select :'cur_user' "cur_user";
 cur_user
----------
 tpchuser
(1 row)

tpch_db=> GRANT SELECT, INSERT, UPDATE, DELETE, TRUNCATE, REFERENCES, TRIGGER ON ALL TABLES IN SCHEMA :"cur_schema_name" TO :"cur_user";
GRANT
tpch_db=> ALTER DEFAULT PRIVILEGES IN SCHEMA :"cur_schema_name" GRANT SELECT, INSERT, UPDATE, DELETE, TRUNCATE, REFERENCES, TRIGGER ON TABLES TO :"cur_user";
ALTER DEFAULT PRIVILEGES
tpch_db=> \i :root_path/ddl/tpch_create_table.sql
 Create Table : cur_schema_name
--------------------------------
 tpch1g
(1 row)

CREATE TABLE
CREATE TABLE
CREATE TABLE
CREATE TABLE
CREATE TABLE
CREATE TABLE
CREATE TABLE
CREATE TABLE
tpch_db=> \i :root_path/ddl/tpch_create_index.sql
 Create Table : cur_schema_name
--------------------------------
 tpch1g
(1 row)

CREATE INDEX
CREATE INDEX
CREATE INDEX
CREATE INDEX
CREATE INDEX
CREATE INDEX
CREATE INDEX
CREATE INDEX
CREATE INDEX
CREATE INDEX
CREATE INDEX
CREATE INDEX
CREATE INDEX
CREATE INDEX
CREATE INDEX
CREATE INDEX
CREATE INDEX
CREATE INDEX
CREATE INDEX
CREATE INDEX
CREATE INDEX
CREATE INDEX
CREATE INDEX

tpch_db=> \i :root_path/ddl/tpch_load_1g_data.sql
COPY 5
COPY 25
COPY 150000
COPY 10000
COPY 200000
COPY 800000
COPY 1500000
COPY 6001215
tpch_db=> \q
[alloyuser@omnidb ~]$
If for some reason you want to set the table to a different user, you can run the following commands to generate the SQL statements to rename table owner.
Right now we have the data ready. Let’s do some checking with one TPCH Query. The query is Query 6 : Forecasting Revenue Change Query. This query quantifies the amount of revenue increase that would have resulted from eliminating certain companywide discounts in a given percentage range in a given year. Asking this type of “what if” query can be used to look for ways to increase revenues. I will start with enable_columnar_scan parameter off. Run twice to make sure no major impact from caching.
[alloyuser@omnidb ddl]$ psql -h localhost -U tpchuser -d tpch_db
psql (13.11, server 15.2)
WARNING: psql major version 13, server major version 15.
         Some psql features might not work.
Type "help" for help.

tpch_db=> show google_columnar_engine.enable_columnar_scan;
 google_columnar_engine.enable_columnar_scan
---------------------------------------------
 on
(1 row)

tpch_db=> SET google_columnar_engine.enable_columnar_scan=off;
SET
tpch_db=> show google_columnar_engine.enable_columnar_scan;
 google_columnar_engine.enable_columnar_scan
---------------------------------------------
 off
(1 row)

tpch_db=> set search_path to tpch1g,public;
SET
tpch_db=> show search_path;
  search_path
----------------
 tpch1g, public
(1 row)

tpch_db=> \timing on
Timing is on.
tpch_db=> select
        sum(l_extendedprice * l_discount) as revenue
from
        lineitem
where
        l_shipdate >= date '1995-01-01'
        and l_shipdate < date '1995-01-01' + interval '1' year
        and l_discount between 0.09 - 0.01 and 0.09 + 0.01
        and l_quantity < 24
limit 1;
    revenue
----------------
 185724059.4734
(1 row)

Time: 284.483 ms
tpch_db=> select
        sum(l_extendedprice * l_discount) as revenue
from
        lineitem
where
        l_shipdate >= date '1995-01-01'
        and l_shipdate < date '1995-01-01' + interval '1' year
        and l_discount between 0.09 - 0.01 and 0.09 + 0.01
        and l_quantity < 24
limit 1;
    revenue
----------------
 185724059.4734
(1 row)

Time: 274.554 ms
Run twice for the queries and timing is around 270~280 ms range with enable_columnar_scan off. Ok, let’s run it again with enable_columnar_scan on.
tpch_db=> SET google_columnar_engine.enable_columnar_scan=on;
SET
Time: 0.200 ms
tpch_db=> select
        sum(l_extendedprice * l_discount) as revenue
from
        lineitem
where
        l_shipdate >= date '1995-01-01'
        and l_shipdate < date '1995-01-01' + interval '1' year
        and l_discount between 0.09 - 0.01 and 0.09 + 0.01
        and l_quantity < 24
limit 1;
    revenue
----------------
 185724059.4734
(1 row)

Time: 278.193 ms
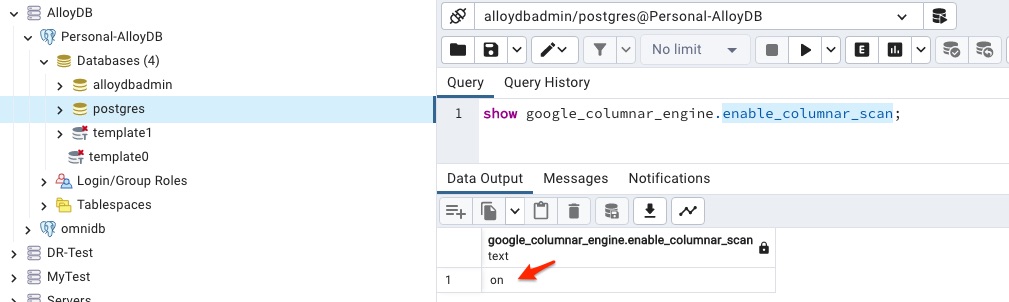
Interesting. It seems timing is similar with parameter off. Let me do another trick with google_columnar_engine_recommend and let see the result.
Wow, the result is much better and drop to less than 30 ms, which is about 10 times faster. I think the key reason is that I run SELECT google_columnar_engine_recommend() statement, which is doing some magic to put certain data in the columnar store. You may notice I use g_columnar_columns view. This view is one of 30 views providing stats about AlloyDB on columnar engine and the index advisory. This g_columnar_columns view provides detail information about the columns that are in the columnar store. If a column is frequently used, it is likely to stay in the columnar store. It will have significant impact in the performance of the queries. From above, you can see that there is no rows in view. After I run google_columnar_engine_recommend statement, it has four rows. This caused the performance improvement in the same query. I will have a separate blog to discuss the columnar views in AlloyDB.
So far I show the basic of the AlloyDB Omni. One common question will be asked: how this compare with same configuration of PostgreSQL database? In the next blog, I will create a GCE VM with identical configuration and load the same TPCH data. Let’s see how is performance difference between AlloyDB Omni and PostgreSQL. Stay tune.
Usually there are two popular approaches to connect to a PostgreSQL based database: psql or pgAdmin.
PSQL
Let’s start with psql. In the last blog of AlloyDB Omni Installation, I show how to run psql from the AlloyDB Omni container by executing the docker exec to connect the Omni instance. In this blog, I add a few more steps to create a dummy db and a table for my quick test.
[alloyuser@omnidb ~]$ sudo yum list | grep postgres
pcp-pmda-postgresql.x86_64                           6.0.5-4.el9                        appstream
postgres-decoderbufs.x86_64                          1.4.0-4.Final.el9                  appstream
postgresql.x86_64                                    13.11-1.el9                        appstream
postgresql-contrib.x86_64                            13.11-1.el9                        appstream
postgresql-jdbc.noarch                               42.2.27-1.el9                      appstream
postgresql-odbc.x86_64                               12.02.0000-6.el9                   appstream
postgresql-plperl.x86_64                             13.11-1.el9                        appstream
postgresql-plpython3.x86_64                          13.11-1.el9                        appstream
postgresql-pltcl.x86_64                              13.11-1.el9                        appstream
postgresql-private-libs.x86_64                       13.11-1.el9                        appstream
postgresql-server.x86_64                             13.11-1.el9                        appstream
postgresql-upgrade.x86_64                            13.11-1.el9                        appstream
qt5-qtbase-postgresql.i686                           5.15.9-7.el9                       appstream
qt5-qtbase-postgresql.x86_64                         5.15.9-7.el9                       appstream
tuned-profiles-postgresql.noarch                     2.20.0-1.el9                       appstream
[alloyuser@omnidb ~]$ sudo yum install -y postgresql.x86_64
Last metadata expiration check: 0:00:51 ago on Sun 20 Aug 2023 01:19:10 PM CDT.
Dependencies resolved.
=======================================================================================================================================
 Package                                   Architecture             Version                          Repository                   Size
=======================================================================================================================================
Installing:
 postgresql                                x86_64                   13.11-1.el9                      appstream                   1.6 M
Installing dependencies:
 postgresql-private-libs                   x86_64                   13.11-1.el9                      appstream                   135 k

Transaction Summary
=======================================================================================================================================
Install  2 Packages

Total download size: 1.7 M
Installed size: 6.0 M
Downloading Packages:
(1/2): postgresql-private-libs-13.11-1.el9.x86_64.rpm                                                  396 kB/s | 135 kB     00:00
(2/2): postgresql-13.11-1.el9.x86_64.rpm                                                               2.6 MB/s | 1.6 MB     00:00
---------------------------------------------------------------------------------------------------------------------------------------
Total                                                                                                  1.8 MB/s | 1.7 MB     00:00
Running transaction check
Transaction check succeeded.
Running transaction test
Transaction test succeeded.
Running transaction
  Preparing        :                                                                                                               1/1
  Installing       : postgresql-private-libs-13.11-1.el9.x86_64                                                                    1/2
  Installing       : postgresql-13.11-1.el9.x86_64                                                                                 2/2
  Running scriptlet: postgresql-13.11-1.el9.x86_64                                                                                 2/2
  Verifying        : postgresql-13.11-1.el9.x86_64                                                                                 1/2
  Verifying        : postgresql-private-libs-13.11-1.el9.x86_64                                                                    2/2

Installed:
  postgresql-13.11-1.el9.x86_64                               postgresql-private-libs-13.11-1.el9.x86_64

Complete!
[alloyuser@omnidb ~]$ psql -h localhost -U postgres
psql (13.11, server 15.2)
WARNING: psql major version 13, server major version 15.
         Some psql features might not work.
Type "help" for help.

postgres=# \c testdb
psql (13.11, server 15.2)
WARNING: psql major version 13, server major version 15.
         Some psql features might not work.
You are now connected to database "testdb" as user "postgres".
testdb=# select * from test1;
 test_col1
-----------
         3
         4
(2 rows)
If check the psql version between the one within docker container and the one I just installed, you will notice that the psql version in the Omni docker container is v15.2 while the one I just installed is v13.11.
pgAdmin
Ok, we are done with the connection with psql. Let’s show how to connect using pgAdmin. There are many articles about how to install pgAdmin and I am not going to repeat here. I have pgAdmin installed on my laptop and would like connect from my laptop rather than install pgAdmin in a GCE VM and connect from there.
As my little VM does not have public IP, in order to connect it from my pgAdmin, I need to use IAP TCP Forwarding. This approach allows me to establish an encrypted tunnel over which I can forward database traffic using PostgreSQL port 5432. The benefit of IAP TCP forwarding allows me to have a VM that does not have direct access over internet while I can access it from my laptop without using VPN. To use tunnel SSH connections through my VM’s internal IP address, I need to use the gcloud compute ssh command with the --tunnel-through-iap flag. More detail can be found in GCP’s documentations at Connect to Linux VMs using Identity-Aware Proxy or Securely connecting to VM instances.
Ok, here is one single line of command to run. Make sure NOT to close this session window when you are using pgAdmin because the traffic is via the localhost (127.0.0.1).
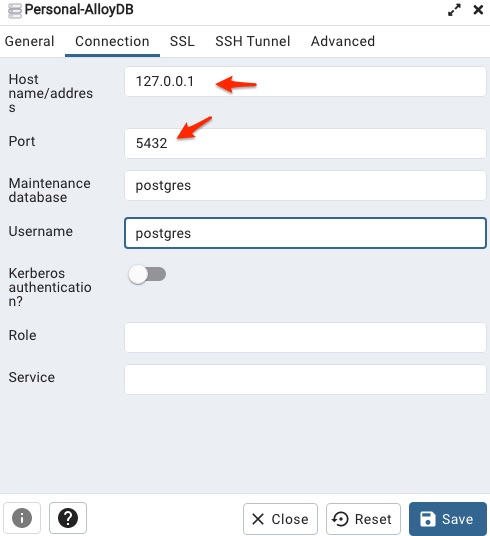
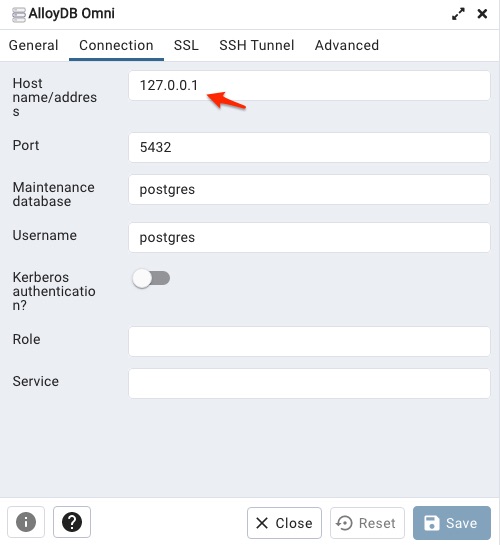
Open pgAdmin and the provide the following information when configuring the connection. Please note: the host ip address is 127.0.0.1, not your VM’s private IP address.
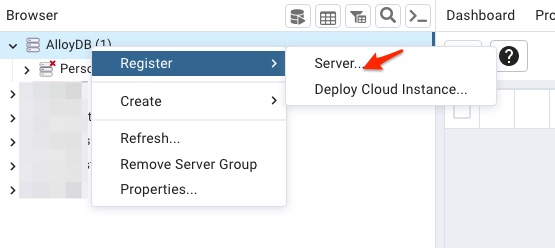
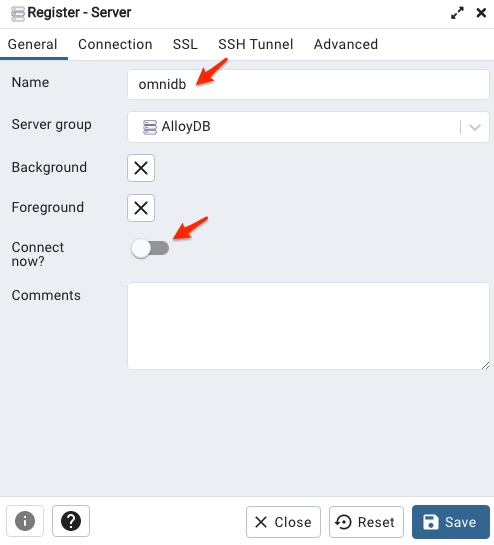
Here are the screenshots during the configuration
Register Server
General Tab
Connection Tab
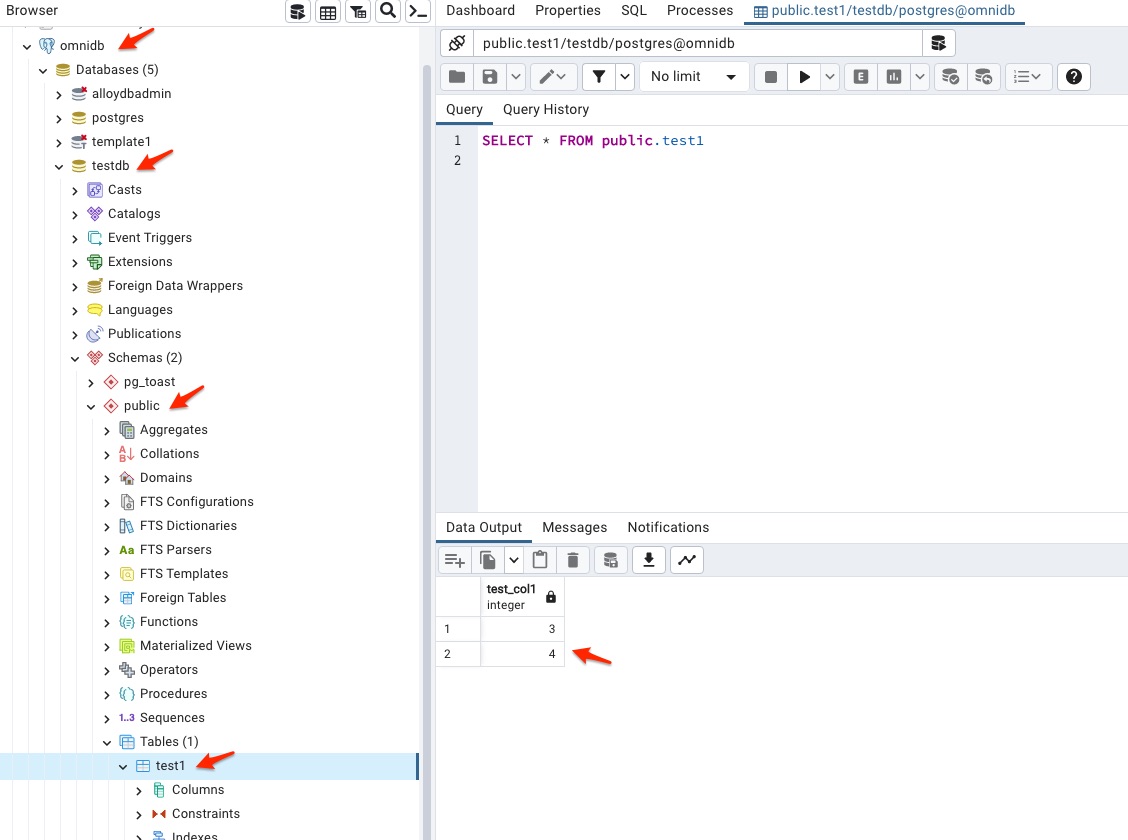
After click the Save button, then I can connect to the omnidb. Important note, for password, it is postgres by default for postgres user. After the connecting successfully, I can see the little test1 table in pgAdmin.
Ok, we are done with the connection to the AlloyDB Omni using both psql and pgAdmin. In the next blog, I am going to discuss how to load TPCH data into this Omni DB instance and execute some fun stuff unique in AlloyDB.
Google has a nice page detailing how to install AlloyDB Omni and Install AlloyDB Omni on a VM. It provides detail about how to install and configure AlloyDB. My approach is slightly different than the above two links. But the basic of the installation is the same. The purpose of this post is to execute the commands below with a few environment variable changes.
Step 1 : Create GCE VM
Set environment variables. Make sure to replace the values in your environment. There are a few changes I made differently what Google recommends
CPU : Ideally you want to have minimum of 16 CPU for large data volume. For my environment, 4 CPU is enough for my testing and also save cost as well.
Disk Storage : The recommended size of disk is at least 100GB. But I decided to use 50 GB instead.
OS : Google use Debian based OS. I personally prefer Centos or Redhat as this is the popular linux OS my customers usually prefer. In this example, I use Centos OS.
OS Version : Initially I tried Centos 7 and it failed during Omnidb installation due to filesystem tmpfs. Then I moved up to Centos 8, it still caused issue in CGroup V2. I could manually perform the changes for CGroup V2. For simplicity, I just moved up again to Centos 9, which finally fixed all of my issues.
Private IP address : I don’t like create VM with public IP. So I add no-address flag to create private VM. Of course, OS Login needs to be enabled as well.
SSH Connection : There are a few ways to connect the private VM. My preference is using IAP using SSH Tunnel.
export VM_NAME=omnidb1
export VM_DISK_SIZE=50
export VM_MACHINE_TYPE=n2-highmem-4
export VM_OS_IMAGE=projects/centos-cloud/global/images/centos-stream-9-v20230711
export GCP_PROJECT=<put your project id here>
export GCP_ZONE=us-west4-b
export GCP_SUBNET=<put your subnet here>
export GCP_SERVICE_ACCOUNT=<put your GCP Service account here>
There are a few notes for my installation of packages:
AlloyDB Omni requires Docker installation. So I include Docker installation.
Because I will need to use TPCH to generate testing data. My prefer way is to generate the data by my self using TPCH’s dbgen script. This script requires the compilation. So I include the installation of make and “Development Tools”
sudo yum install -y yum-utils wget unzip make
sudo yum group install -y "Development Tools"
Step 3 : Install and Configure Docker
The following steps show how to install, configure and test Docker in the VM.
This step is optional. You can use whatever user id you ssh to the VM and perform the rest steps below. But personally, I prefer to create a separate user as a better way to manage the activities down in the road. I also set the time zone to the right time zone as well.
export ALLOYDB_USER=alloyuser
sudo useradd -g adm -G docker,google-sudoers ${ALLOYDB_USER}
groups
id ${ALLOYDB_USER}
sudo timedatectl set-timezone America/Chicago
ls -l /etc/localtime
sudo su ${ALLOYDB_USER}
cd
pwd
Step 5 : Install AlloyDB Omni
Execute the following code as it is, it will install the AlloyDB Omni database if successful.
docker pull gcr.io/alloydb-omni/pg-service:latest
docker pull gcr.io/alloydb-omni/memory-agent:latest
docker image ls

cd
mkdir install
cd install
gsutil ls gs://alloydb-omni-install
gsutil cp -r gs://alloydb-omni-install/$(gsutil cat gs://alloydb-omni-install/latest) .
ls -l
cd $(gsutil cat gs://alloydb-omni-install/latest)

ls -l
tar -xzf alloydb_omni_installer.tar.gz && cd installer
sudo bash install_alloydb.sh
If successful, the result will be something as follows:
[alloyuser@omnidb weidong.zhou]$ docker pull gcr.io/alloydb-omni/pg-service:latest
latest: Pulling from alloydb-omni/pg-service
267f288e9329: Pull complete
0b57a5d95214: Pull complete
7d920f8a053e: Pull complete
afcae9374567: Pull complete
849d91eb7ea9: Pull complete
Digest: sha256:1376b0faa50a9fac95a1c5777eafca3e38bc2b9d8e1883cf8857fba7474cdb1e
Status: Downloaded newer image for gcr.io/alloydb-omni/pg-service:latest
gcr.io/alloydb-omni/pg-service:latest
[alloyuser@omnidb weidong.zhou]$ docker pull gcr.io/alloydb-omni/memory-agent:latest
latest: Pulling from alloydb-omni/memory-agent
267f288e9329: Already exists
0b57a5d95214: Already exists
aff0e617551a: Pull complete
Digest: sha256:8c60aa4dacd6d2e3ab7d19255cd3e0c0205dd011838e9f3c9e020301a5c12f93
Status: Downloaded newer image for gcr.io/alloydb-omni/memory-agent:latest
gcr.io/alloydb-omni/memory-agent:latest
[alloyuser@omnidb weidong.zhou]$ docker image ls
REPOSITORY                         TAG       IMAGE ID       CREATED        SIZE
gcr.io/alloydb-omni/pg-service     latest    390a2d7a12a8   8 days ago     1.89GB
gcr.io/alloydb-omni/memory-agent   latest    5f4bedeb8ff3   8 days ago     204MB
hello-world                        latest    9c7a54a9a43c   3 months ago   13.3kB
[alloyuser@omnidb weidong.zhou]$ cd
[alloyuser@omnidb ~]$ mkdir install
[alloyuser@omnidb ~]$ cd install
[alloyuser@omnidb install]$ gsutil ls gs://alloydb-omni-install
gs://alloydb-omni-install/latest
gs://alloydb-omni-install/alloydb-omni-0.1.0-preview-postgresql-14.4/
gs://alloydb-omni-install/alloydb-omni-0.2.0-preview-postgresql-14.4/
gs://alloydb-omni-install/alloydb-omni-0.3.0-preview-postgresql-15.2/
[alloyuser@omnidb install]$ gsutil cp -r gs://alloydb-omni-install/$(gsutil cat gs://alloydb-omni-install/latest) .
Copying gs://alloydb-omni-install/alloydb-omni-0.3.0-preview-postgresql-15.2/alloydb_omni_installer.tar.gz...
/ [1 files][ 12.6 KiB/ 12.6 KiB]
Operation completed over 1 objects/12.6 KiB.
[alloyuser@omnidb install]$ ls -l
total 0
drwxr-xr-x. 2 alloyuser adm 43 Aug 16 07:34 alloydb-omni-0.3.0-preview-postgresql-15.2
[alloyuser@omnidb install]$ cd $(gsutil cat gs://alloydb-omni-install/latest)
[alloyuser@omnidb alloydb-omni-0.3.0-preview-postgresql-15.2]$ ls -l
total 16
-rw-r--r--. 1 alloyuser adm 12958 Aug 16 07:34 alloydb_omni_installer.tar.gz
[alloyuser@omnidb alloydb-omni-0.3.0-preview-postgresql-15.2]$ tar -xzf alloydb_omni_installer.tar.gz && cd installer
[alloyuser@omnidb installer]$ sudo bash install_alloydb.sh
2023-08-16 07:34:46.007 CDT: [install_alloydb.sh:59] Starting installation of AlloyDB Omni...
2023-08-16 07:34:46.009 CDT: [install_alloydb.sh:61] Checking hardware requirements for AlloyDB Omni...
2023-08-16 07:34:46.015 CDT: [install_alloydb.sh:64] Checking software requirements for AlloyDB Omni...
2023-08-16 07:34:46.090 CDT: [install_alloydb.sh:67] Configuring installation files...
2023-08-16 07:34:46.105 CDT: [install_alloydb.sh:70] Setting up postgres user...
2023-08-16 07:34:46.172 CDT: [install_alloydb.sh:73] Configuring systemd services...
Created symlink /etc/systemd/system/multi-user.target.wants/alloydb-setup-env.service → /etc/systemd/system/alloydb-setup-env.service.
Created symlink /etc/systemd/system/multi-user.target.wants/alloydb-dataplane.service → /etc/systemd/system/alloydb-dataplane.service.
2023-08-16 07:34:46.548 CDT: [install_alloydb.sh:76] Copying configuration files...
2023-08-16 07:34:46.558 CDT: [install_alloydb.sh:79] Creating internal directories...
2023-08-16 07:34:46.562 CDT: [install_alloydb.sh:82] Finished installing AlloyDB Omni
Please note: you may run into the error like “FATAL: AlloyDB Omni requires cgroups V2 to run.” There are some manual steps to configure cgroups for Centos 7 or 8. But the easiest way is to use Centos 9.
Step 6 : Post installation of AlloyDB Omni
I need to change certain configuration in the AlloyDB Omni. In the code below, I also show the difference where the configuration changes.


You must be logged in to post a comment.