In the Part 1 of AlloyDB Blog Series, I discussed the Introduction of AlloyDB for PostgresSQL. Then in Part 2 of the blog series, I discussed how to do the installation of AlloyDB Omni in a GCE VM. In Part 3, I will show how to connect to AlloyDB Omni using psql and pgAdmin.
Usually there are two popular approaches to connect to a PostgreSQL based database: psql or pgAdmin.
PSQL
Let’s start with psql. In the last blog of AlloyDB Omni Installation, I show how to run psql from the AlloyDB Omni container by executing the docker exec to connect the Omni instance. In this blog, I add a few more steps to create a dummy db and a table for my quick test.
docker exec -it pg-service psql -h localhost -U postgres
\conninfo
create database testdb;
create table test1 ( test_col1 int);
insert into test1 values ( 3 );
insert into test1 values ( 4 );
select * from test1;
\q
Here is the result:
[alloyuser@omnidb ~]$ docker exec -it pg-service psql -h localhost -U postgres
psql (15.2)
Type "help" for help.

postgres=# \conninfo
You are connected to database "postgres" as user "postgres" on host "localhost" (address "127.0.0.1") at port "5432".
postgres=# create database testdb;
CREATE DATABASE
postgres=# \c testdb
You are now connected to database "testdb" as user "postgres".
testdb=# create table test1 ( test_col1 int);
CREATE TABLE
testdb=# insert into test1 values ( 3 );
INSERT 0 1
testdb=# insert into test1 values ( 4 );
INSERT 0 1
testdb=# select * from test1;
 test_col1
-----------
         3
         4
(2 rows)

testdb=# \q
But this is not what I want. I want the psql can be executed from my omnidb vm. So I install a PostgreSQL client by executing the followings:
sudo yum update -y
sudo yum list | grep postgres
sudo yum install -y postgresql.x86_64
psql -h localhost -U postgres
Here is the result looks like:
[alloyuser@omnidb ~]$ sudo yum list | grep postgres
pcp-pmda-postgresql.x86_64                           6.0.5-4.el9                        appstream
postgres-decoderbufs.x86_64                          1.4.0-4.Final.el9                  appstream
postgresql.x86_64                                    13.11-1.el9                        appstream
postgresql-contrib.x86_64                            13.11-1.el9                        appstream
postgresql-jdbc.noarch                               42.2.27-1.el9                      appstream
postgresql-odbc.x86_64                               12.02.0000-6.el9                   appstream
postgresql-plperl.x86_64                             13.11-1.el9                        appstream
postgresql-plpython3.x86_64                          13.11-1.el9                        appstream
postgresql-pltcl.x86_64                              13.11-1.el9                        appstream
postgresql-private-libs.x86_64                       13.11-1.el9                        appstream
postgresql-server.x86_64                             13.11-1.el9                        appstream
postgresql-upgrade.x86_64                            13.11-1.el9                        appstream
qt5-qtbase-postgresql.i686                           5.15.9-7.el9                       appstream
qt5-qtbase-postgresql.x86_64                         5.15.9-7.el9                       appstream
tuned-profiles-postgresql.noarch                     2.20.0-1.el9                       appstream
[alloyuser@omnidb ~]$ sudo yum install -y postgresql.x86_64
Last metadata expiration check: 0:00:51 ago on Sun 20 Aug 2023 01:19:10 PM CDT.
Dependencies resolved.
=======================================================================================================================================
 Package                                   Architecture             Version                          Repository                   Size
=======================================================================================================================================
Installing:
 postgresql                                x86_64                   13.11-1.el9                      appstream                   1.6 M
Installing dependencies:
 postgresql-private-libs                   x86_64                   13.11-1.el9                      appstream                   135 k

Transaction Summary
=======================================================================================================================================
Install  2 Packages

Total download size: 1.7 M
Installed size: 6.0 M
Downloading Packages:
(1/2): postgresql-private-libs-13.11-1.el9.x86_64.rpm                                                  396 kB/s | 135 kB     00:00
(2/2): postgresql-13.11-1.el9.x86_64.rpm                                                               2.6 MB/s | 1.6 MB     00:00
---------------------------------------------------------------------------------------------------------------------------------------
Total                                                                                                  1.8 MB/s | 1.7 MB     00:00
Running transaction check
Transaction check succeeded.
Running transaction test
Transaction test succeeded.
Running transaction
  Preparing        :                                                                                                               1/1
  Installing       : postgresql-private-libs-13.11-1.el9.x86_64                                                                    1/2
  Installing       : postgresql-13.11-1.el9.x86_64                                                                                 2/2
  Running scriptlet: postgresql-13.11-1.el9.x86_64                                                                                 2/2
  Verifying        : postgresql-13.11-1.el9.x86_64                                                                                 1/2
  Verifying        : postgresql-private-libs-13.11-1.el9.x86_64                                                                    2/2

Installed:
  postgresql-13.11-1.el9.x86_64                               postgresql-private-libs-13.11-1.el9.x86_64

Complete!
[alloyuser@omnidb ~]$ psql -h localhost -U postgres
psql (13.11, server 15.2)
WARNING: psql major version 13, server major version 15.
         Some psql features might not work.
Type "help" for help.

postgres=# \c testdb
psql (13.11, server 15.2)
WARNING: psql major version 13, server major version 15.
         Some psql features might not work.
You are now connected to database "testdb" as user "postgres".
testdb=# select * from test1;
 test_col1
-----------
         3
         4
(2 rows)
If check the psql version between the one within docker container and the one I just installed, you will notice that the psql version in the Omni docker container is v15.2 while the one I just installed is v13.11.
pgAdmin
Ok, we are done with the connection with psql. Let’s show how to connect using pgAdmin. There are many articles about how to install pgAdmin and I am not going to repeat here. I have pgAdmin installed on my laptop and would like connect from my laptop rather than install pgAdmin in a GCE VM and connect from there.
As my little VM does not have public IP, in order to connect it from my pgAdmin, I need to use IAP TCP Forwarding. This approach allows me to establish an encrypted tunnel over which I can forward database traffic using PostgreSQL port 5432. The benefit of IAP TCP forwarding allows me to have a VM that does not have direct access over internet while I can access it from my laptop without using VPN. To use tunnel SSH connections through my VM’s internal IP address, I need to use the gcloud compute ssh command with the --tunnel-through-iap flag. More detail can be found in GCP’s documentations at Connect to Linux VMs using Identity-Aware Proxy or Securely connecting to VM instances.
Ok, here is one single line of command to run. Make sure NOT to close this session window when you are using pgAdmin because the traffic is via the localhost (127.0.0.1).
gcloud compute ssh --zone $GCP_ZONE $VM_NAME --ssh-flag="-L 5432:localhost:5432" --tunnel-through-iap --project $GCP_PROJECT
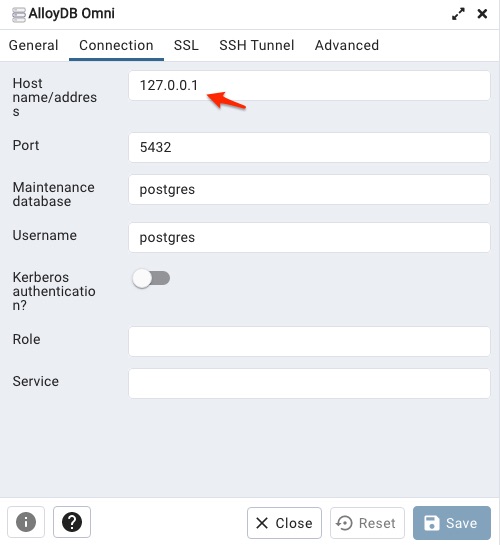
Open pgAdmin and the provide the following information when configuring the connection. Please note: the host ip address is 127.0.0.1, not your VM’s private IP address.
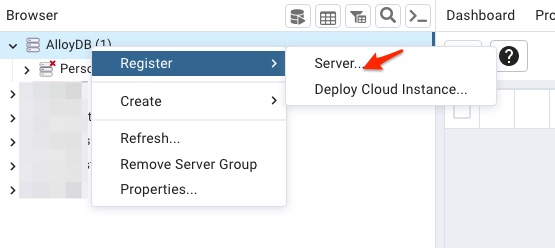
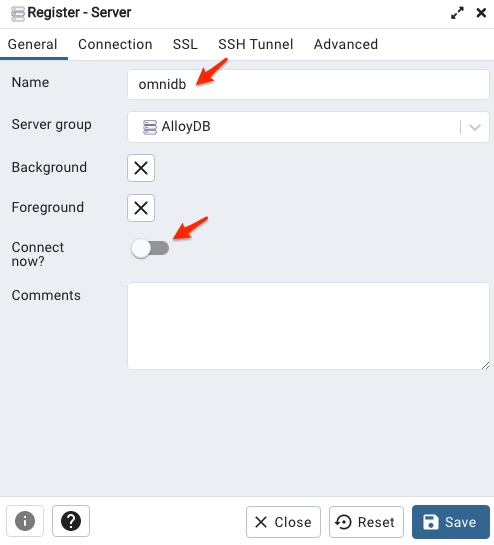
Here are the screenshots during the configuration
Register Server
General Tab
Connection Tab
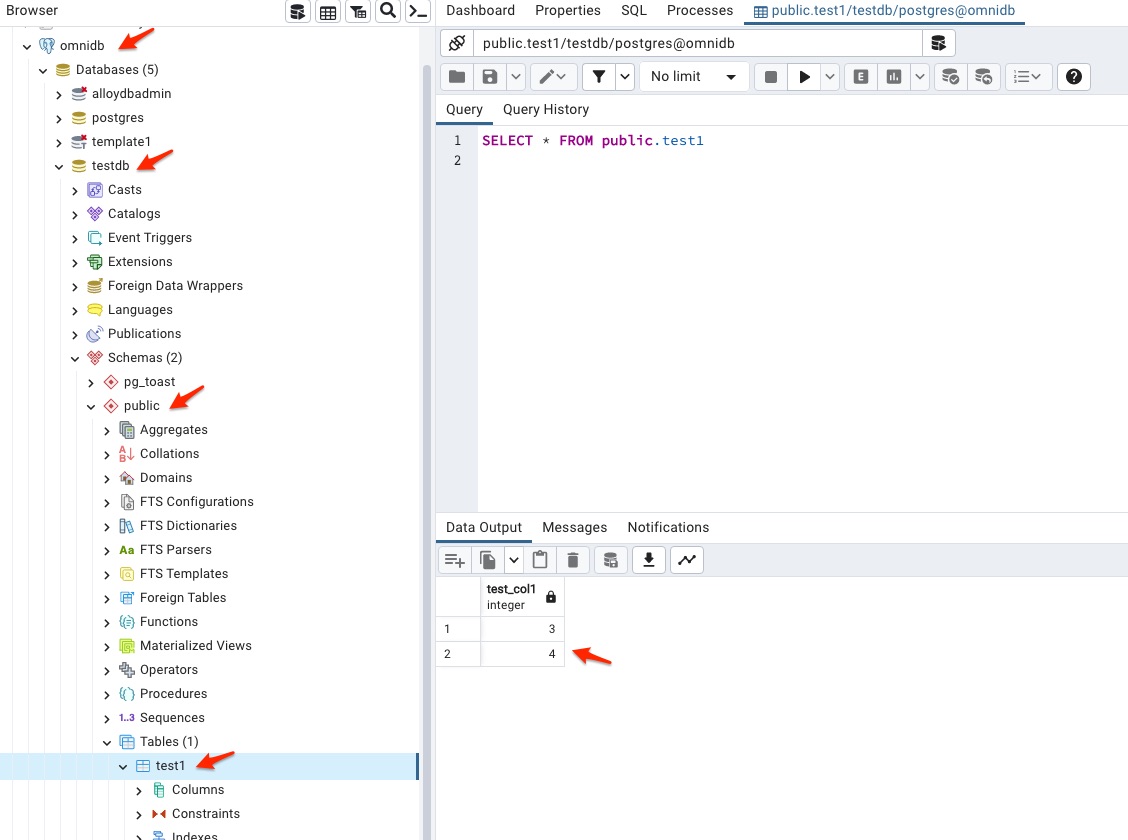
After click the Save button, then I can connect to the omnidb. Important note, for password, it is postgres by default for postgres user. After the connecting successfully, I can see the little test1 table in pgAdmin.
Ok, we are done with the connection to the AlloyDB Omni using both psql and pgAdmin. In the next blog, I am going to discuss how to load TPCH data into this Omni DB instance and execute some fun stuff unique in AlloyDB.

You must be logged in to post a comment.