Use Toad to Access Hadoop Ecosystem

Sometime back I wrote a blog about Use SQL Developer to Access Hive Table on Hadoop. Recently I noticed another similar product: Toad for Hadoop. So I decided to give a try.
Like many people, I like Toad products in general and use Toad in many of my projects. Toad for Hadoop is a new product in the Toad family. The current version is Toad for Hadoop 1.3.1 Beta on Windows platform only. The software supports Cloudera CDH 5.x and Hortonworks Data Platform 2.3. The software is free for now. But You need to create an account with Dell before you can download the zip file. The entire process of installation and configuration are pretty simple and straight forward. Here are the steps:

Download the zip files
Go to Toad for Hadoop. Click Download button. The zip file is 555 MB in size.

Installation
I installed the software in my Window VM. Just double click ToadHadoop_1.3.1_Beta_x64.exe file and take the default values for all of installation screens. At the end of installation, it will open the software automatically.

Configuration
Unlike so many buttons in the regular Toad software, this one looks quite simple.
Toad_config_1
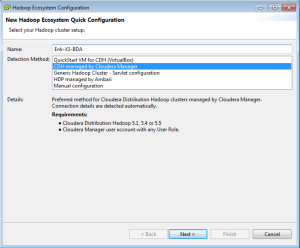
Click the dropdown box on the right of Ecosystem box, then click Add New Ecosystem. The Select your Hadoop Cluster setup screen shows up as follows.
Toad_config_2
Input the name you want for this connection. For this one, I configured the connection for our X3 Big Data Appliance (BDA) full rack cluster with 18 nodes. So I input the Name as Enk-X3-DBA. For Detection Method, you can see it support Cloudera CDH via Cloudera Manager or Hortonworks HDP via Ambari. For this one, I chose CDH managed by Cloudera Manager for Detection Method.

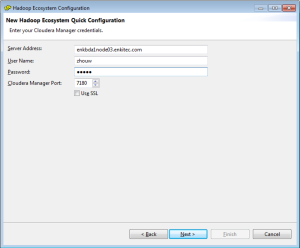
Next screen is to Enter your Cloudera Manager credentials. Use the same url and port number that you access your Cludera Manager for Server Address. The user name is the user name you access Cludera Manager. Make sure you create your user directory on HDFS before you run the installation of the software, for example, create a folder /user/zhouw and change the permission to zhouw user for read/write access. Otherwise you will see permission exception later on.
Toad_config_3
Next screen shows Autodetection. It does many checks and validations and you should see the successful status for all of them.
Toad_config_4
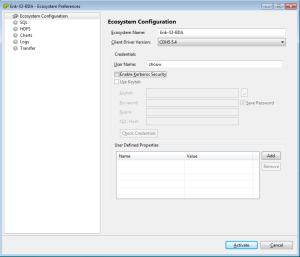
Next one shows Ecosystem Configuration. In this screen, I just input zhouw for User Name. Then click Activate button. There is a bug in this version. Sometimes both Activate and Cancel buttons disappear. The workaround is just to close and restart the software.
Toad_config_5

SQL Screen
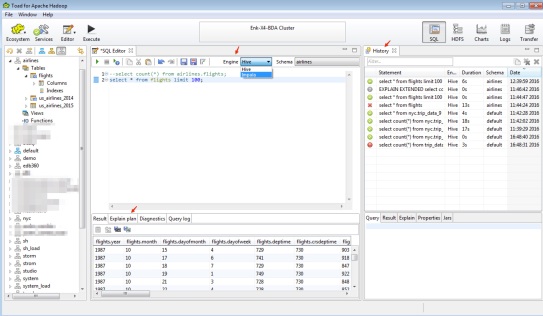
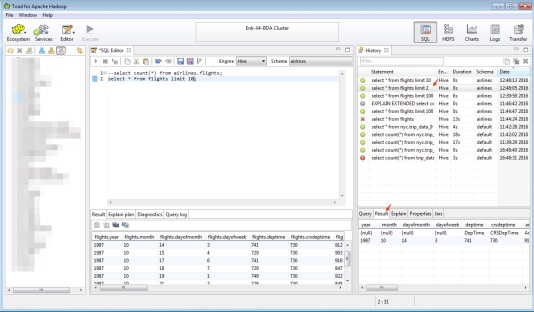
The most frequently used screen is SQL Screen. You can run the SQLs against either Hive or Impala engine.
Toad_SQL_1
The screen is very similar to traditional Toad screen I use to. On the left panel, it shows the schemas and table names. The bottom panel shows the result. Although it has Explain Plan tab in the result panel, I usually consider Explain Plan on Hadoop as a joke at this time of writing. You can take a look, but I would not waste the time in checking out the plan. You will see more issues from other parts of Hadoop world instead of suboptimal query plans. The History panel on the right is an interesting one, which I found it very useful later on. It is not only shows the timing for my queries (or jobs), but also cache the result from the previous runs. It proves a smart feature and I don’t have to rerun my queries to get the result back.
Toad_SQL_2
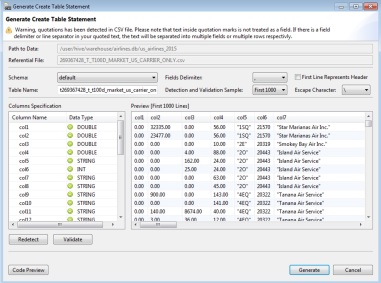
Sometimes you might want to check out DDLs for certain tables. You can just right click the table and select Generate Create Table statement as follows:
Toad_Generate_table_1
Here is an example of generated DDL.
Toad_Generate_table_2

HDFS Screen
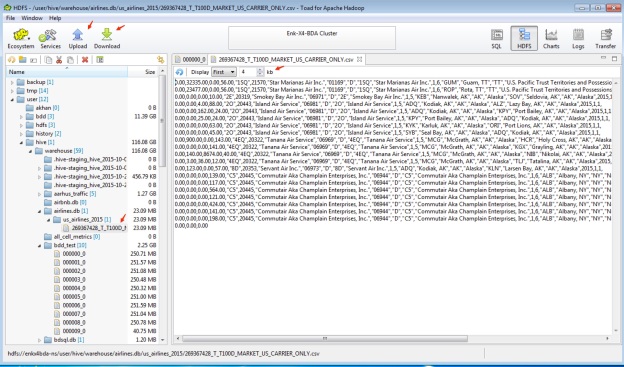
HDFS Screen is another feature I really like. It works just like Window Explorer and shows HDFS directory and files under it in tree structure. It also shows the size information for directory and files. With just a few clicks, you can quickly find out which directories and files are taking a lot of space. On the right panel, it can show you some content of the files. By default, it shows the first 4K of data. Very convenient and save me the time in typing multiple commands to find out the same kind of information. If you want to download and upload files from/to HDFS, just click Download and Upload buttons on the top.
Toad_HDFS_1
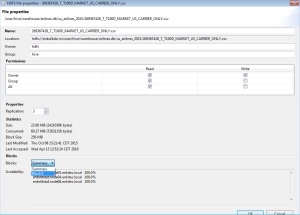
Sometimes I am interested in the replication factor and physical locations of certain files on HDFS. Just right click the file on HDFS, then select Properties.
Toad_File_Properties
It shows everything about this file. For sizing information, it shows both Summary and individual block information.
Toad_File_Property_1

Chart Screen
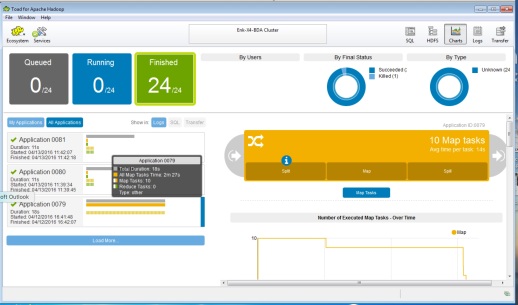
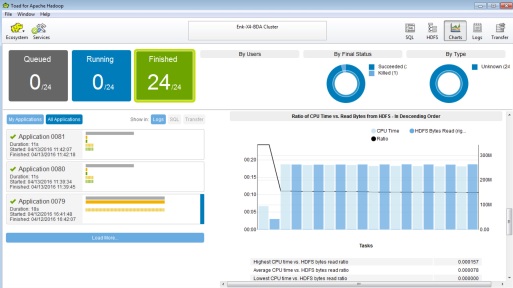
The Chart Screen also looks nice. It does not have many charts in Cloudera Manager, but does have the necessary key information I usually want to know. I just list a few of them as follows:
Toad_Chart_1

Toad_Chart_3

Log Screen
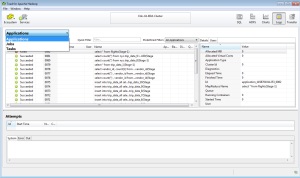
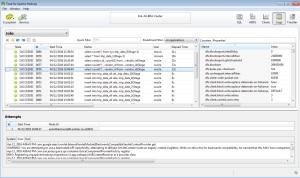
The Log Screen is an ok one. Here are some of them:
Toad_Log_1

Toad_Log_2

Transfer Screen
The Transfer Screen is supposed to support the data to/from RDBMS, like Oracle, MySQL and SQL Server. I haven’t really tried out this one.
Toad_Transfer_1

Service Screen
The Service Screen is useful when you want to know where you deploy your services on Hadoop, like hostname and port number for certain services. It does not have everything, but good enough.
Toad_Service_1

Toad_Service_2

In general, Toad for Hadoop is a nice tool that can help you to quickly find out certain information on Hadoop without going through many screens and commands. I would say this tools is for Hadoop Administrators instead of regular Hadoop user. The reason is that you probably don’t want to give the Cloudera Manager access for every user.

Use incremental import in sqoop to load data from Oracle (Part II)

The last post discussed the first part of creating incremental import job in sqoop. This post will continue the discussion for the
2nd part of the of the series.

In the last few posts, I discussed the following:
1. Install Cloudera Hadoop Cluster using Cloudera Manager
2. Configurations after CDH Installation
3. Load Data to Hive Table.
4. Import Data to Hive from Oracle Database
5. Export data from Hive table to Oracle Database.
6. Use Impala to query a Hive table
7. Use incremental import in sqoop to load data from Oracle (Part I)

Although we can pass many arguments to execute the sqoop job just what I did in the last post, there is a better way to manage this kind of work by using sqoop job and can do the similar work as showing the picture below.
sqoop_incremental_2

First, let me create a sqoop job using the following command:
sqoop job \
–create student_job \
— import \
–connect jdbc:oracle:thin:@enkx3-scan:1521:dbm2 \
–username wzhou \
–password wzhou \
–table STUDENT \
–incremental append \
–check-column student_id \
–last-value 7 \
-m 4 \
–split-by major

Once the sqoop job is created, I can use the following commands to show, execute or delete a sqoop job.
sqoop job –list
sqoop job –show student_job
sqoop job –exec student_job
sqoop job –delete student_job

Here are the execution results:
[wzhou@vmhost1 ~]$ sqoop job \
> –create student_job \
> — import \
> –connect jdbc:oracle:thin:@enkx3-scan:1521:dbm2 \
> –username wzhou \
> –password wzhou \
> –table STUDENT \
> –incremental append \
> –check-column student_id \
> –last-value 7 \
> -m 4 \
> –split-by major

Warning: /usr/lib/sqoop/../accumulo does not exist! Accumulo imports will fail.
Please set $ACCUMULO_HOME to the root of your Accumulo installation.
15/09/25 13:57:34 INFO sqoop.Sqoop: Running Sqoop version: 1.4.5-cdh5.4.3
15/09/25 13:57:35 WARN tool.BaseSqoopTool: Setting your password on the command-line is insecure. Consider using -P instead.

[wzhou@vmhost1 ~]$ sqoop job –list
Warning: /usr/lib/sqoop/../accumulo does not exist! Accumulo imports will fail.
Please set $ACCUMULO_HOME to the root of your Accumulo installation.
15/09/25 13:57:47 INFO sqoop.Sqoop: Running Sqoop version: 1.4.5-cdh5.4.3
Available jobs:
student_job

[wzhou@vmhost1 ~]$ sqoop job –show student_job
Warning: /usr/lib/sqoop/../accumulo does not exist! Accumulo imports will fail.
Please set $ACCUMULO_HOME to the root of your Accumulo installation.
15/09/25 13:58:07 INFO sqoop.Sqoop: Running Sqoop version: 1.4.5-cdh5.4.3
Enter password:
Job: student_job
Tool: import
Options:
—————————-
verbose = false
incremental.last.value = 7
db.connect.string = jdbc:oracle:thin:@enkx3-scan:1521:dbm2
codegen.output.delimiters.escape = 0
codegen.output.delimiters.enclose.required = false
codegen.input.delimiters.field = 0
hbase.create.table = false
db.require.password = true
hdfs.append.dir = true
db.table = STUDENT
codegen.input.delimiters.escape = 0
import.fetch.size = null
accumulo.create.table = false
codegen.input.delimiters.enclose.required = false
db.username = wzhou
codegen.output.delimiters.record = 10
import.max.inline.lob.size = 16777216
hbase.bulk.load.enabled = false
hcatalog.create.table = false
db.clear.staging.table = false
incremental.col = student_id
codegen.input.delimiters.record = 0
enable.compression = false
hive.overwrite.table = false
hive.import = false
codegen.input.delimiters.enclose = 0
accumulo.batch.size = 10240000
hive.drop.delims = false
codegen.output.delimiters.enclose = 0
hdfs.delete-target.dir = false
codegen.output.dir = .
codegen.auto.compile.dir = true
relaxed.isolation = false
mapreduce.num.mappers = 4
accumulo.max.latency = 5000
import.direct.split.size = 0
codegen.output.delimiters.field = 44
export.new.update = UpdateOnly
incremental.mode = AppendRows
hdfs.file.format = TextFile
codegen.compile.dir = /tmp/sqoop-wzhou/compile/5c52e95144738b92047bd2e1e37d1b1f
direct.import = false
db.split.column = major
hive.fail.table.exists = false
db.batch = false

[wzhou@vmhost1 ~]$ sqoop job –exec student_job
Warning: /usr/lib/sqoop/../accumulo does not exist! Accumulo imports will fail.
Please set $ACCUMULO_HOME to the root of your Accumulo installation.
15/09/25 14:05:19 INFO sqoop.Sqoop: Running Sqoop version: 1.4.5-cdh5.4.3
Enter password:
15/09/25 14:05:22 INFO oracle.OraOopManagerFactory: Data Connector for Oracle and Hadoop is disabled.
15/09/25 14:05:22 INFO manager.SqlManager: Using default fetchSize of 1000
15/09/25 14:05:22 INFO tool.CodeGenTool: Beginning code generation
15/09/25 14:05:23 INFO manager.OracleManager: Time zone has been set to GMT
15/09/25 14:05:23 INFO manager.SqlManager: Executing SQL statement: SELECT t.* FROM STUDENT t WHERE 1=0
15/09/25 14:05:23 INFO orm.CompilationManager: HADOOP_MAPRED_HOME is /usr/lib/hadoop-mapreduce
Note: /tmp/sqoop-wzhou/compile/67a12da72d209152325de07df2841b68/STUDENT.java uses or overrides a deprecated API.
Note: Recompile with -Xlint:deprecation for details.
15/09/25 14:05:25 INFO orm.CompilationManager: Writing jar file: /tmp/sqoop-wzhou/compile/67a12da72d209152325de07df2841b68/STUDENT.jar
15/09/25 14:05:26 INFO manager.OracleManager: Time zone has been set to GMT
15/09/25 14:05:26 INFO tool.ImportTool: Maximal id query for free form incremental import: SELECT MAX(student_id) FROM STUDENT
15/09/25 14:05:26 INFO tool.ImportTool: Incremental import based on column student_id
15/09/25 14:05:26 INFO tool.ImportTool: No new rows detected since last import.

As expected, no rows were inserted. So let me insert a few more rows and rerun the jobs.
Run the following SQL commands to insert the rows on Oracle database.
insert into wzhou.student values ( 8, ‘student8’, ‘history’);
insert into wzhou.student values ( 9, ‘student9’, ‘math’);
insert into wzhou.student values ( 10, ‘student10’, ‘computer’ );
commit;

Rerun the job and it shows 3 rows inserted.
[wzhou@vmhost1 ~]$ sqoop job –exec student_job
Warning: /usr/lib/sqoop/../accumulo does not exist! Accumulo imports will fail.
Please set $ACCUMULO_HOME to the root of your Accumulo installation.
15/09/25 14:08:49 INFO sqoop.Sqoop: Running Sqoop version: 1.4.5-cdh5.4.3
Enter password:
15/09/25 14:08:53 INFO oracle.OraOopManagerFactory: Data Connector for Oracle and Hadoop is disabled.
15/09/25 14:08:53 INFO manager.SqlManager: Using default fetchSize of 1000
15/09/25 14:08:53 INFO tool.CodeGenTool: Beginning code generation
15/09/25 14:08:53 INFO manager.OracleManager: Time zone has been set to GMT
15/09/25 14:08:53 INFO manager.SqlManager: Executing SQL statement: SELECT t.* FROM STUDENT t WHERE 1=0
15/09/25 14:08:53 INFO orm.CompilationManager: HADOOP_MAPRED_HOME is /usr/lib/hadoop-mapreduce
Note: /tmp/sqoop-wzhou/compile/b4ec871b912ecfebe6b03a510f000581/STUDENT.java uses or overrides a deprecated API.
Note: Recompile with -Xlint:deprecation for details.
15/09/25 14:08:55 INFO orm.CompilationManager: Writing jar file: /tmp/sqoop-wzhou/compile/b4ec871b912ecfebe6b03a510f000581/STUDENT.jar
15/09/25 14:08:56 INFO manager.OracleManager: Time zone has been set to GMT
15/09/25 14:08:56 INFO tool.ImportTool: Maximal id query for free form incremental import: SELECT MAX(student_id) FROM STUDENT
15/09/25 14:08:56 INFO tool.ImportTool: Incremental import based on column student_id
15/09/25 14:08:56 INFO tool.ImportTool: Lower bound value: 7
15/09/25 14:08:56 INFO tool.ImportTool: Upper bound value: 10
15/09/25 14:08:56 INFO mapreduce.ImportJobBase: Beginning import of STUDENT
15/09/25 14:08:56 INFO Configuration.deprecation: mapred.jar is deprecated. Instead, use mapreduce.job.jar
15/09/25 14:08:56 INFO Configuration.deprecation: mapred.map.tasks is deprecated. Instead, use mapreduce.job.maps
15/09/25 14:08:56 INFO client.RMProxy: Connecting to ResourceManager at vmhost1.local/192.168.56.71:8032
15/09/25 14:08:59 INFO db.DBInputFormat: Using read commited transaction isolation
15/09/25 14:08:59 INFO db.DataDrivenDBInputFormat: BoundingValsQuery: SELECT MIN(major), MAX(major) FROM STUDENT WHERE ( student_id > 7 AND student_id use test_oracle;
OK
Time taken: 1.548 seconds

hive> select * from student_ext;
OK
2 student2 computer
4 student4 accounting
1 student1 math
3 student3 math
5 student3 computer
7 student5 computer
6 student4 math
10 student10 computer
8 student8 history
9 student9 math

Time taken: 0.694 seconds, Fetched: 10 row(s)

We can see the new rows with student8, 9 and 10.

Use incremental import in sqoop to load data from Oracle (Part I)

This is a two parts series in discussing incremental import job in sqoop. This post is the first part of the series.

In the last few posts, I discussed the following:
1. Install Cloudera Hadoop Cluster using Cloudera Manager
2. Configurations after CDH Installation
3. Load Data to Hive Table.
4. Import Data to Hive from Oracle Database
5. Export data from Hive table to Oracle Database.
6. Use Impala to query a Hive table
When using sqoop to load data to hive table from an Oracle table, it’s not always loading a full table to hive in one shot, just like taking many days’ work to build the house below. In other words, it is common to load partial data from Oracle table to an existing Hive table. This is where we need to use sqoop incremental job to do the work.

sqoop_incremental_1

First, I create a simple table to illustrate the process for incremental import.
1. Create the source table.
Run the following query to create a new table on Oracle database.

<b>create table wzhou.student
(
student_id number(8) not null,
student_name varchar2(20) not null,
major varchar2(20),
CONSTRAINT student_pk PRIMARY KEY (student_id)
);
insert into wzhou.student values ( 1, 'student1', 'math' );
insert into wzhou.student values ( 2, 'student2', 'computer' );
insert into wzhou.student values ( 3, 'student3', 'math' );
insert into wzhou.student values ( 4, 'student4', 'accounting' );

commit;
select * from wzhou.student;</b>

2. Create the import command.

sqoop import \
--connect jdbc:oracle:thin:@enkx3-scan:1521:dbm2 \
--username wzhou \
--password wzhou \
--table STUDENT \
--incremental append \
--check-column student_id \
-m 4 \
--split-by major

check-column argument specifies which column to be checked during the import operation. The column can not be *CHAR type, like VARCHAR2 or CHAR.

incremental argument can have two modes: append and lastmodified. Lasmodified argument is usually used with a lastmodified column defined as timestamp.
Last-value argument is used to specify a value that new rows with greater than this value will be insert.
or use other ways, suggested by one internet article:
–last-value $($HIVE_HOME/bin/hive -e “select max(idcolumn) from tablename”)

Note 1:
If seeing the following error, make sure the tablename specified in –table argument in UPPERCASE. If it is lowercase, you could see the error below.
ERROR tool.ImportTool: Imported Failed: There is no column found in the target table all_objects_inc_test. Please ensure that your table name is correct.

Note 2:
If using –hive-import argument, you could see the following error. It is not supported yet. So have to remove it and build Hive External table after complete the import data to hdfs.
ERROR Append mode for hive imports is not yet supported. Please remove the parameter –append-mode.

3. Execute the Table Import to Hive.
[wzhou@vmhost1 ~]$ sqoop import \
> –connect jdbc:oracle:thin:@enkx3-scan:1521:dbm2 \
> –username wzhou \
> –password wzhou \
> –table STUDENT \
> –incremental append \
> –check-column student_id \
> -m 4 \
> –split-by major

Warning: /usr/lib/sqoop/../accumulo does not exist! Accumulo imports will fail.
Please set $ACCUMULO_HOME to the root of your Accumulo installation.
15/09/25 05:14:22 INFO sqoop.Sqoop: Running Sqoop version: 1.4.5-cdh5.4.3
15/09/25 05:14:22 WARN tool.BaseSqoopTool: Setting your password on the command-line is insecure. Consider using -P instead.
. . . .
15/09/25 05:17:33 INFO mapreduce.ImportJobBase: Transferred 74 bytes in 184.558 seconds (0.401 bytes/sec)
15/09/25 05:17:33 INFO mapreduce.ImportJobBase: Retrieved 4 records.
15/09/25 05:17:33 INFO util.AppendUtils: Creating missing output directory – STUDENT
15/09/25 05:17:33 INFO tool.ImportTool: Incremental import complete! To run another incremental import of all data following this import, supply the following arguments:
15/09/25 05:17:33 INFO tool.ImportTool: –incremental append
15/09/25 05:17:33 INFO tool.ImportTool: –check-column student_id
15/09/25 05:17:33 INFO tool.ImportTool: –last-value 4
15/09/25 05:17:33 INFO tool.ImportTool: (Consider saving this with ‘sqoop job –create’)

Notice there is a line of –last-value 4 at the end of execution. This is correct as I imported only 4 rows. The result file is under /user/wzhou/STUDENT. Let’s verify it.

[wzhou@vmhost1 ~]$ hdfs dfs -ls /user/wzhou/STUDENT
Found 5 items
-rw-r--r--   2 wzhou bigdata          0 2015-09-25 05:14 /user/wzhou/STUDENT/part-m-00000
-rw-r--r--   2 wzhou bigdata         42 2015-09-25 05:15 /user/wzhou/STUDENT/part-m-00001
-rw-r--r--   2 wzhou bigdata          0 2015-09-25 05:16 /user/wzhou/STUDENT/part-m-00002
-rw-r--r--   2 wzhou bigdata          0 2015-09-25 05:17 /user/wzhou/STUDENT/part-m-00003
-rw-r--r--   2 wzhou bigdata         32 2015-09-25 05:17 /user/wzhou/STUDENT/part-m-00004
[wzhou@vmhost1 ~]$ hdfs dfs -cat /user/wzhou/STUDENT/part*
2,student2,computer
4,student4,accounting
1,student1,math
3,student3,math
[wzhou@vmhost1 ~]$ hdfs dfs -cat /user/wzhou/STUDENT/part*1
2,student2,computer
4,student4,accounting
[wzhou@vmhost1 ~]$ hdfs dfs -cat /user/wzhou/STUDENT/part*4
1,student1,math
3,student3,math

Result looks good so far.

4. Create Hive external table. The new hive external table on Hadoop is still under test_oracle database.
hive
USE test_oracle;
CREATE EXTERNAL TABLE student_ext (
student_id string,
student_name string,
major string
)
ROW FORMAT DELIMITED FIELDS TERMINATED BY ‘,’
LINES TERMINATED BY ‘\n’
LOCATION ‘/user/wzhou/STUDENT’;

select * from student_ext;

Here are the result.
[wzhou@vmhost1 ~]$ hive
hive> USE test_oracle;
OK
Time taken: 1.547 seconds
hive> CREATE EXTERNAL TABLE student_ext (
> student_id string,
> student_name string,
> major string
> )
> ROW FORMAT DELIMITED FIELDS TERMINATED BY ‘,’
> LINES TERMINATED BY ‘\n’
> LOCATION ‘/user/wzhou/STUDENT’;

OK
Time taken: 1.266 seconds
hive> select * from student_ext;
OK
2 student2 computer
4 student4 accounting
1 student1 math
3 student3 math
Time taken: 0.679 seconds, Fetched: 4 row(s)

5. 2nd Round of Insert.
Let me to test out more insert to see how incremental import works. On oracle database, create a few more rows.

insert into wzhou.student values ( 5, ‘student3’, ‘computer’);
insert into wzhou.student values ( 6, ‘student4’, ‘math’);
insert into wzhou.student values ( 7, ‘student5’, ‘computer’ );
commit;

6. Rerun the incremental import command.
[wzhou@vmhost1 ~]$ sqoop import \
> –connect jdbc:oracle:thin:@enkx3-scan:1521:dbm2 \
> –username wzhou \
> –password wzhou \
> –table STUDENT \
> –incremental append \
> –check-column student_id \
> -m 4 \
> –split-by major

Warning: /usr/lib/sqoop/../accumulo does not exist! Accumulo imports will fail.
Please set $ACCUMULO_HOME to the root of your Accumulo installation.
15/09/25 05:39:50 INFO sqoop.Sqoop: Running Sqoop version: 1.4.5-cdh5.4.3
15/09/25 05:39:51 WARN tool.BaseSqoopTool: Setting your password on the command-line is insecure. Consider using -P instead.
15/09/25 05:39:51 INFO oracle.OraOopManagerFactory: Data Connector for Oracle and Hadoop is disabled.
. . . .
15/09/25 05:42:54 INFO mapreduce.ImportJobBase: Transferred 130 bytes in 178.3882 seconds (0.7287 bytes/sec)
15/09/25 05:42:54 INFO mapreduce.ImportJobBase: Retrieved 7 records.
15/09/25 05:42:54 INFO util.AppendUtils: Appending to directory STUDENT
15/09/25 05:42:54 INFO util.AppendUtils: Using found partition 5
15/09/25 05:42:54 INFO tool.ImportTool: Incremental import complete! To run another incremental import of all data following this import, supply the following arguments:
15/09/25 05:42:54 INFO tool.ImportTool: –incremental append
15/09/25 05:42:54 INFO tool.ImportTool: –check-column student_id
15/09/25 05:42:54 INFO tool.ImportTool: –last-value 7
15/09/25 05:42:54 INFO tool.ImportTool: (Consider saving this with ‘sqoop job –create’)

Interesting, the result is not what I expect. I expected only three rows will be inserted. But it seem all 7 rows are inserted. Let me verify the result.

[wzhou@vmhost1 ~]$ hdfs dfs -ls /user/wzhou/STUDENT
Found 10 items
-rw-r--r--   2 wzhou bigdata          0 2015-09-25 05:14 /user/wzhou/STUDENT/part-m-00000
-rw-r--r--   2 wzhou bigdata         42 2015-09-25 05:15 /user/wzhou/STUDENT/part-m-00001
-rw-r--r--   2 wzhou bigdata          0 2015-09-25 05:16 /user/wzhou/STUDENT/part-m-00002
-rw-r--r--   2 wzhou bigdata          0 2015-09-25 05:17 /user/wzhou/STUDENT/part-m-00003
-rw-r--r--   2 wzhou bigdata         32 2015-09-25 05:17 /user/wzhou/STUDENT/part-m-00004
-rw-r--r--   2 wzhou bigdata          0 2015-09-25 05:40 /user/wzhou/STUDENT/part-m-00005
-rw-r--r--   2 wzhou bigdata         82 2015-09-25 05:41 /user/wzhou/STUDENT/part-m-00006
-rw-r--r--   2 wzhou bigdata          0 2015-09-25 05:41 /user/wzhou/STUDENT/part-m-00007
-rw-r--r--   2 wzhou bigdata          0 2015-09-25 05:42 /user/wzhou/STUDENT/part-m-00008
-rw-r--r--   2 wzhou bigdata         48 2015-09-25 05:42 /user/wzhou/STUDENT/part-m-00009

[wzhou@vmhost1 ~]$ hdfs dfs -cat /user/wzhou/STUDENT/part*6
2,student2,computer
4,student4,accounting
5,student3,computer
7,student5,computer

[wzhou@vmhost1 ~]$ hdfs dfs -cat /user/wzhou/STUDENT/part*9
1,student1,math
3,student3,math
6,student4,math

Hive result. 
hive> select * from student_ext;
OK
2	student2	computer
4	student4	accounting
1	student1	math
3	student3	math
2	student2	computer
4	student4	accounting
5	student3	computer
7	student5	computer
1	student1	math
3	student3	math
6	student4	math
Time taken: 0.085 seconds, Fetched: 11 row(s)

Ok, let me look at the result from Impala.

[vmhost3:21000] > select count(*) from student_ext;
Query: select count(*) from student_ext
+----------+
| count(*) |
+----------+
| 4        |
+----------+
Fetched 1 row(s) in 0.85s

Interesting. Impala shows 4 rows instead of 11 rows. The reason is that impala does not refresh metadata regularly. So need to do the invalidate metadata to get the last row count. Hive doesn’t seem have this issue.

[vmhost3:21000] > invalidate metadata;
Query: invalidate metadata

Fetched 0 row(s) in 4.48s
[vmhost3:21000] > select count(*) from student_ext;
Query: select count(*) from student_ext
+----------+
| count(*) |
+----------+
| 11       |
+----------+
Fetched 1 row(s) in 0.94s

7. Solution to fix this issue.
The solution is to add one more argument, last-value, to specify where the load stop last time. I redoed the step 1 to 5.
sqoop import \
–connect jdbc:oracle:thin:@enkx3-scan:1521:dbm2 \
–username wzhou \
–password wzhou \
–table STUDENT \
–incremental append \
–check-column student_id \
–last-value 4 \
-m 4 \
–split-by major

Here are the result

HDFS
[wzhou@vmhost1 ~]$ hdfs dfs -ls /user/wzhou/STUDENT
Found 9 items
-rw-r--r--   2 wzhou bigdata          0 2015-09-25 05:14 /user/wzhou/STUDENT/part-m-00000
-rw-r--r--   2 wzhou bigdata         42 2015-09-25 05:15 /user/wzhou/STUDENT/part-m-00001
-rw-r--r--   2 wzhou bigdata          0 2015-09-25 05:16 /user/wzhou/STUDENT/part-m-00002
-rw-r--r--   2 wzhou bigdata          0 2015-09-25 05:17 /user/wzhou/STUDENT/part-m-00003
-rw-r--r--   2 wzhou bigdata         32 2015-09-25 05:17 /user/wzhou/STUDENT/part-m-00004
-rw-r--r--   2 wzhou bigdata         40 2015-09-25 06:02 /user/wzhou/STUDENT/part-m-00005
-rw-r--r--   2 wzhou bigdata          0 2015-09-25 06:02 /user/wzhou/STUDENT/part-m-00006
-rw-r--r--   2 wzhou bigdata          0 2015-09-25 06:03 /user/wzhou/STUDENT/part-m-00007
-rw-r--r--   2 wzhou bigdata         16 2015-09-25 06:04 /user/wzhou/STUDENT/part-m-00008
[wzhou@vmhost1 ~]$ hdfs dfs -cat /user/wzhou/STUDENT/part*5
5,student3,computer
7,student5,computer
[wzhou@vmhost1 ~]$ hdfs dfs -cat /user/wzhou/STUDENT/part*8
6,student4,math

Hive
hive> select * from student_ext;
OK
2	student2	computer
4	student4	accounting
1	student1	math
3	student3	math
5	student3	computer
7	student5	computer
6	student4	math
Time taken: 0.095 seconds, Fetched: 7 row(s)

Impala
[vmhost3:21000] > select count(*) from student_ext;
Query: select count(*) from student_ext
+----------+
| count(*) |
+----------+
| 7        |
+----------+
Fetched 1 row(s) in 0.82s

Ok, everything looks good right now.

Use Impala to query a Hive table

Previously, I discussed the followings:
In the last few posts, I discussed the following:
1. Install Cloudera Hadoop Cluster using Cloudera Manager
2. Configurations after CDH Installation
3. Load Data to Hive Table.
4. Import Data to Hive from Oracle Database
5. Export data from Hive table to Oracle Database.
Although Hive is popular in Hadoop world, it has its own drawback, like excessive Map/Reduce operations for certain queries and JVM overhead during Map/Reduce. Impala is designed to improve the query performance accessing data on HDFS. Hive is SQL on Hadoop while Impala is the SQL on HDFS. Hive is using MapReduce job to get the query result while Impala is using the its daemons running on the data nodes to directly access the files on HDFS and don’t use Map/Reduce at all.

There are two ways to use Impala to query tables in Hive. One way is to use command line, Impala Shell. Another one is to use Hue GUI. I am going to show both methods one by one.

Use Impala Shell
Impala Shell is a nice tool similar to SQL Plus to setup database and tables and issue queries. The speed of ad hoc queries is much faster than Hive’s query, especially for queries requiring fast response time. Here are the steps in using Impala shell.

1. Logon as wzhou user and start the impala shell.
[wzhou@vmhost1 ~]$ impala-shell
Starting Impala Shell without Kerberos authentication
Error connecting: TTransportException, Could not connect to vmhost1.local:21000
Welcome to the Impala shell. Press TAB twice to see a list of available commands.
Copyright (c) 2012 Cloudera, Inc. All rights reserved.
(Shell build version: Impala Shell v2.2.0-cdh5.4.3 (517bb0f) built on Wed Jun 24 19:17:40 PDT 2015)
[Not connected] >

Note: The prompt shows Not connected. I need to connect the Impala shell to any Data Node with impalad daemon. My cluster is using vmhost2 and vmhost3 as Data Node. So I pick any one of them, use vmhost2 for this test.
[Not connected] > connect vmhost2;
Connected to vmhost2:21000
Server version: impalad version 2.2.0-cdh5.4.3 RELEASE (build 517bb0f71cd604a00369254ac6d88394df83e0f6)
[vmhost2:21000] >

2. Run some queries. Impala can see the same list of databases and tables like Hive does.

[vmhost2:21000] > show databases;
Query: show databases
+------------------+
| name             |
+------------------+
| _impala_builtins |
| default          |
| test1            |
| test_oracle      |
+------------------+
Fetched 4 row(s) in 0.01s 

[vmhost2:21000] > use test_oracle;
Query: use test_oracle

[vmhost2:21000] > show tables;
Query: show tables
+----------------------+
| name                 |
+----------------------+
| my_all_objects       |
| my_all_objects_sqoop |
+----------------------+
Fetched 2 row(s) in 0.01s

[vmhost2:21000] > select * from my_all_objects_sqoop limit 3;
Query: select * from my_all_objects_sqoop limit 3
+-------+-------------+-----------+-------------+-------------+
| owner | object_name | object_id | object_type | create_date |
+-------+-------------+-----------+-------------+-------------+
| SYS   | I_USER1     | 46        | INDEX       | 2013-03-12  |
| SYS   | I_OBJ#      | 3         | INDEX       | 2013-03-12  |
| SYS   | I_IND1      | 41        | INDEX       | 2013-03-12  |
+-------+-------------+-----------+-------------+-------------+
Fetched 3 row(s) in 0.04s

[vmhost2:21000] > select count(*) from my_all_objects_sqoop;
Query: select count(*) from my_all_objects_sqoop
+----------+
| count(*) |
+----------+
| 22519    |
+----------+
Fetched 1 row(s) in 1.00s

Use Hue Web UI
Another way to use Impala is to run query from Hue UI.

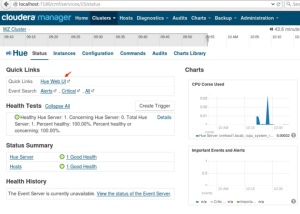
1. From Cloudera Manager screen, click Hue. After Hue screen shows up, click Hue Web UI.
impala_hue_1

2. On Hue home screen, click Query Editors, then choose Impala.
impala_hue_2

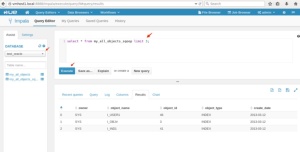
3. After Impala Query Editor screen shows up, select test_oracle under DATABASE. Input the following query, then click Execute.
select * from my_all_objects_sqoop limit 3;
impala_hue_3

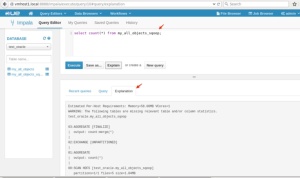
4. Run another query and check out Explain plan.
impala_hue_4

Run Time Comparison between Hive and Impala
Hive
hive> use test_oracle;
OK
Time taken: 0.534 seconds
hive> show tables;
OK
my_all_objects
my_all_objects_sqoop
Time taken: 0.192 seconds, Fetched: 2 row(s)

hive> select count(*) from my_all_objects;
Query ID = wzhou_20150922112626_efde0c06-2f04-44b2-9bf1-47b31e45de03
Total jobs = 1
Launching Job 1 out of 1
Number of reduce tasks determined at compile time: 1
In order to change the average load for a reducer (in bytes):
set hive.exec.reducers.bytes.per.reducer=
In order to limit the maximum number of reducers:
set hive.exec.reducers.max=
In order to set a constant number of reducers:
set mapreduce.job.reduces=
Starting Job = job_1442935988315_0002, Tracking URL = http://vmhost1.local:8088/proxy/application_1442935988315_0002/
Kill Command = /usr/lib/hadoop/bin/hadoop job -kill job_1442935988315_0002
Hadoop job information for Stage-1: number of mappers: 1; number of reducers: 1
2015-09-22 11:26:33,759 Stage-1 map = 0%, reduce = 0%
2015-09-22 11:26:46,563 Stage-1 map = 100%, reduce = 0%, Cumulative CPU 2.25 sec
2015-09-22 11:26:58,035 Stage-1 map = 100%, reduce = 100%, Cumulative CPU 3.97 sec
MapReduce Total cumulative CPU time: 3 seconds 970 msec
Ended Job = job_1442935988315_0002
MapReduce Jobs Launched:
Stage-Stage-1: Map: 1 Reduce: 1 Cumulative CPU: 3.97 sec HDFS Read: 2057365 HDFS Write: 6 SUCCESS
Total MapReduce CPU Time Spent: 3 seconds 970 msec
OK
22782
Time taken: 40.881 seconds, Fetched: 1 row(s)

Impala
Wow, 41 seconds to get a row count of 22,782 by using Hive. That seem excessive on a cluster no other jobs running. Ok, let’s look at Impala’s result.
Note: Impala does not poll frequently for metadata changes. So in case you don’t see the table name after the import, just do the following:
invalidate metadata;
show tables;

[wzhou@vmhost1 ~]$ impala-shell
[Not connected] > connect vmhost2;
Connected to vmhost2:21000
Server version: impalad version 2.2.0-cdh5.4.3 RELEASE (build 517bb0f71cd604a00369254ac6d88394df83e0f6)

[vmhost2:21000] > use test_oracle;
Query: use test_oracle

[vmhost2:21000] > show tables;
Query: show tables
+———————-+
| name |
+———————-+
| my_all_objects |
| my_all_objects_sqoop |
+———————-+
Fetched 2 row(s) in 0.01s

[vmhost2:21000] > select count(*) from my_all_objects;
Query: select count(*) from my_all_objects
+———-+
| count(*) |
+———-+
| 22782 |
+———-+
Fetched 1 row(s) in 0.12s

The above result shows Hive took 41 seconds to get the row count of a table with 22, 782 rows while Impala was significant faster and took 0.12 seconds. I know my cluster is small, not powerful and hive is using Map/Reduce. But getting a total row count of 22,000 needs 45 seconds, it seems too much. On the other hand, Impala’s timing looks more reasonable to me. Obviously Map/Reduce is not my option if I want to run some queries that expect fast response time. But if executing a long running job against a huge dataset, Map/Reduce option might still be on the table if considering job fault tolerance.

Use SQL Developer to Access Hive Table on Hadoop

There are many UI or command-line tool to access Hive data on Hadoop and I am not going to list them one by one. I use SQL Developer a lot in accessing Oracle database and like this powerful tool. That makes me wondering whether I can use SQL Developer to access Hive table on HDFS. After some researches, I did find a way to configure SQL Developer to access Hive table. Here are the steps:

1. Download the JDBC Driver.
Goto Cloudera website, download Hive JDBC Driver at http://www.cloudera.com/content/cloudera/en/downloads/connectors/hive/jdbc/hive-jdbc-v2-5-4.html.
As for now, the latest version of Hive JDBC Connector is v2.5.4. Unzip the zip file to your target directory.

2. Configure SQL Developer
Open SQL Developer, click Preference -> Database -> Third Party JDBC Driver. Click Add Entry to add all of the jar files just unzipped. Close the SQL Developer, reopen it.
1_sql_developer_hive_jdbc_driver

3. Create a Hive Connection
Create a new connection. The port used is HiveSever2 port or the value for hive.server2.thrift.port. In my cluster, it is 10000. I still use test_oracle hive database created in my previous steps. Click Test, it should show Success.
2_sql_developer_hive_connection

4. Access Hive Tables
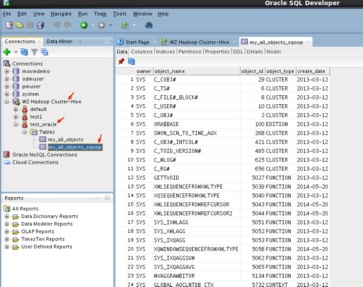
After click Connect, I can connect to my Hive databases on my Hadoop cluster.
3_sql_developer_hive_table
You can see the view and look to access Hive is very similar the way accessing regular oracle table. Awesome! Here are a few more other screens.
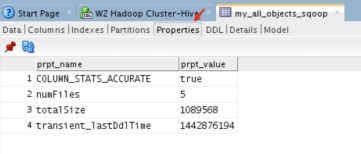
Properties Tab
4_sql_developer_hive_table_properties
DDL Tab
The DDL tab is nice one. The drawback for DDL is that everything is in one line. It would be nice to format the DDL string in a more readable way. Anyway, it is not a big deal.
5_sql_developer_hive_table_ddl
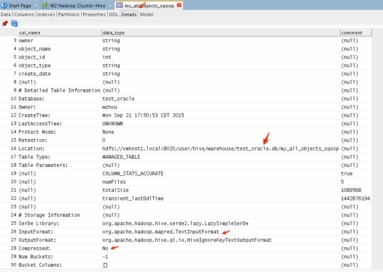
Detail Tab
6_sql_developer_hive_table_detail
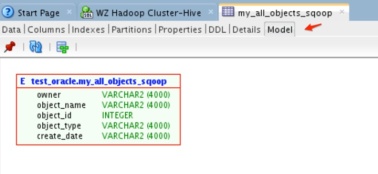
Model Tab
7_sql_developer_hive_table_model

Let me run a query and here is the result, exact the look and feel like I use Oracle.
8_sql_developer_hive_table_query